User and permission management
Standard Watcher users exist within Organizations. One user can be added to several different Organizations and must be added at least to one. If you do not select organization when creating a user, the user is added to the Default Organization.
After installing Watcher, you will see only one user on the Users page - the Watcher Super Administrator having all possible permissions. Do not delete this user as it may lead to incorrect operation of the system.
The newly created users can be assigned with flexible permissions within Organizations and Watcher. Please refer to the table below for explanation of available permissions.
On this page:
- Creating a user in Watcher
- Using the list of Watcher users
- Adding users to an Organization
- Deleting users from an Organization
- Granting a user rights to manage Organizations
- Granting a user access to cameras
Creating a user
Make sure you already have created the Organization to add user in.
To create a user:
- Click Users — Create user.
-
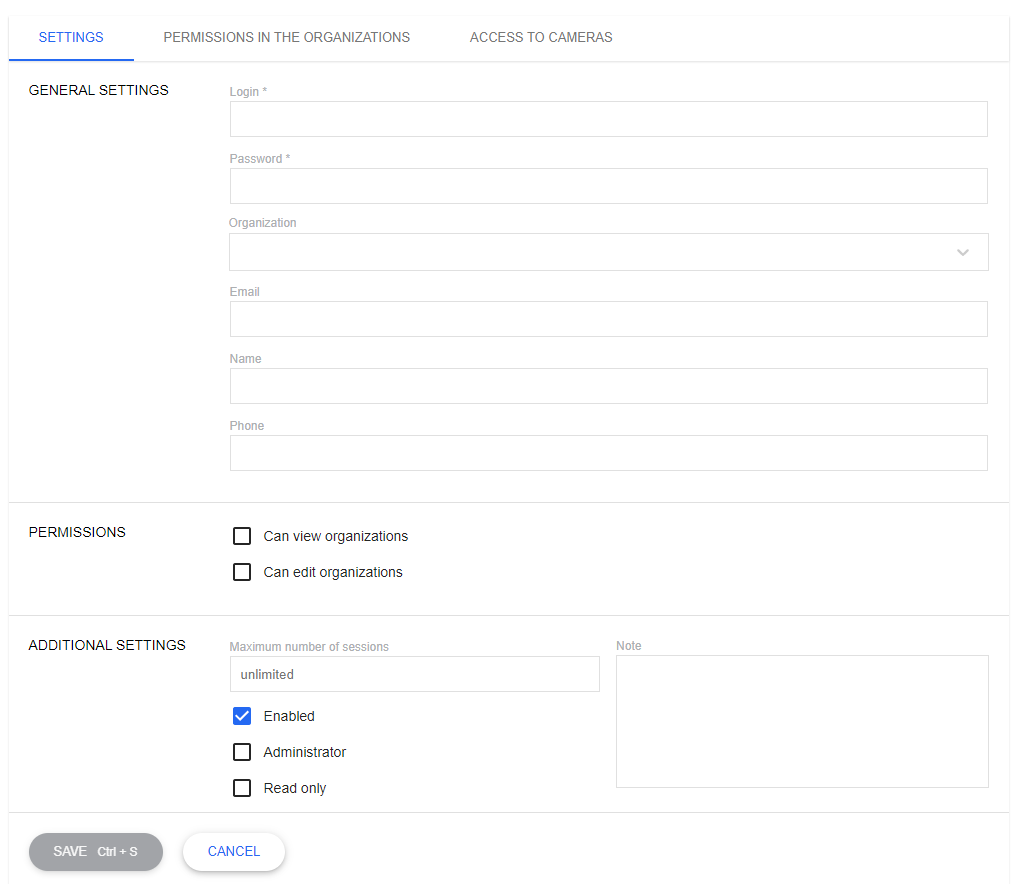
The form to create the user opens.
-
Fill in the user info, change the following settings if necessary:
-
Can view organizations: Check the box to enable the user to view the list of all organizations. If the box is not checked, the user will only see the organizations to which the user is added.
-
Can edit organizations: Check this box to enable the user to edit the organizations. All Organizations become visible to the user when you check this box, i.e. the Can view organizations box is automatically set.
Editing options differ depending on whether the user is an organization administrator. The user can change all the settings in owned organization(s) and only General settings tab in the rest of the organizations.
-
Maximum number of sessions: The maximum number of sessions for the user. This setting allows you to limit the use of the same account by different people, for example, if the user shares credentials with someone else. Each time the user logs into the system (i.e. enters their username and password), a unique session ID is saved in the Watcher database. If the specified number of sessions is exceeded, the oldest session ID is deleted and a new one is created.
-
Enabled: Check the box to activate the user account.
-
Administrator: Check the box to give the user administrator permissions (see details above). When you save the settings after selecting the Administrator checkbox, the checkboxes enabling organizations visibility and editing are automatically checked.
Note
Please note that if you uncheck the Administrator checkbox, the checkboxes enabling organizations visibility and editing are not unchecked automatically. Uncheck them manually if necessary under the Super Administrator account.
-
Read only: Check the box to prohibit the user from any actions with cameras, organizations and users, except for viewing. This checkbox cannot be selected together with the Administrator checkbox. If both are checked, the Administrator checkbox takes precedence, so the Read only checkbox is automatically cleared when you save the user. Otherwise, the Read only checkbox takes precedence over the checkboxes that allow editing organizations, users, and cameras.
-
Watcher user list
The list of all Watcher users is available on the Users page.

This list allows you to:
- Open the user profile for editing or deleting by clicking the user name.
- View Organizations to which the user is added. The names of the Organization(s) owned by the user are highlighted in red. Click the name of the Organization to view its profile.
- Check if the user is Watcher Administrator or has Read-Only permissions.
- Send messages to the user.
- Search users by their login. Click FILTER to open the search form.
Adding users to an Organization
After you have added an Organization to Watcher, you will probably need to add users who will have access to cameras of this Organization. One user can be added to several Organizations.
To add a user to an Organization:
- Go to Organizations.
-
In the list of Organizations, find the Organization where you are going to add a user (or create one) and click the counter in the Users column.
You can also click the name of the Organization and go to the USERS tab in the Organization profile.
-
The page that opens shows the list of all users of this Organization. Click ADD.

-
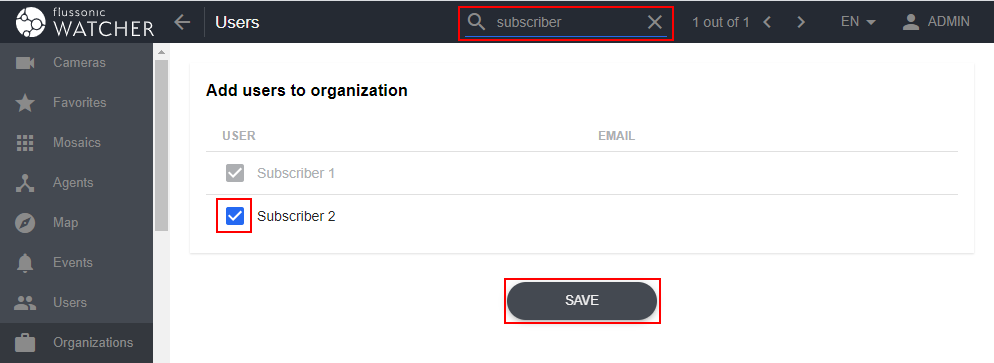
Select Add users from other organizations to add existing user(s). The list of Watcher users open with users already added to this Organization highlighted in grey.
Search for users by their login using the field in the top of the page. Check the users you want to add and click Save.
-
Select Create a user to create a new user within this Organization, then fill in user data and save changes.
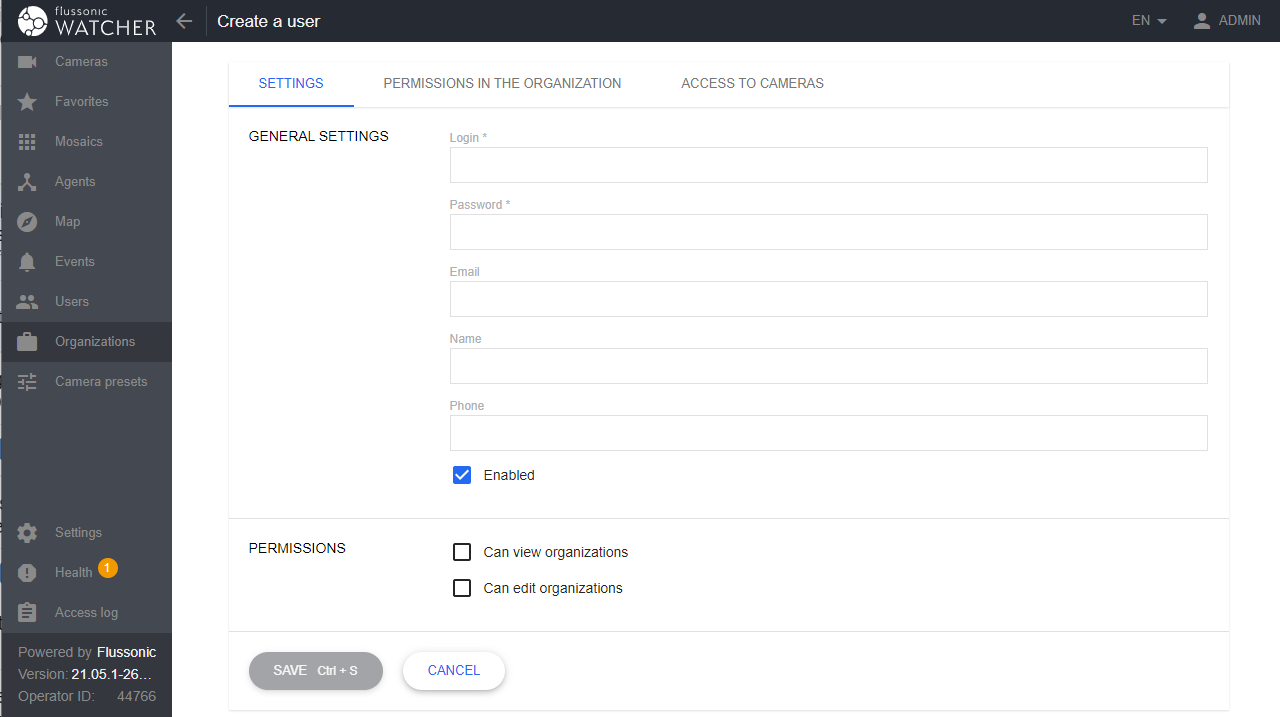
Please note that you need to fill in fewer fields when creating a user this way compared to creating a user from scratch, for example, you do not need to select an organization, because it is already known, and there is no way to make the user Watcher Administrator or assign read-only rights. To set these parameters, you need to go to the user profile through the Users menu.
-
Deleting users from an Organization
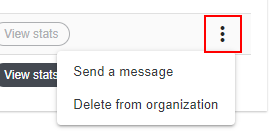
If you want to delete a user from the Organization, go to USERS tab in the Organization profile and select the corresponding item in the three-dot menu on the right in the user row:
Granting a user rights to manage Organizations
One Organization can have a number of users and any user can belong to several Organizations. You can give each user different permissions to manage each Organization.
To change a user's rights to manage an Organization:
-
Go to Organizations and click in the column Users next to the Organization where you want to grant users rights to manage the Organization.

Note
Use FILTER to search for users by their login.
-
In the list of users that opens, click next to each user the permissions that you are giving them:
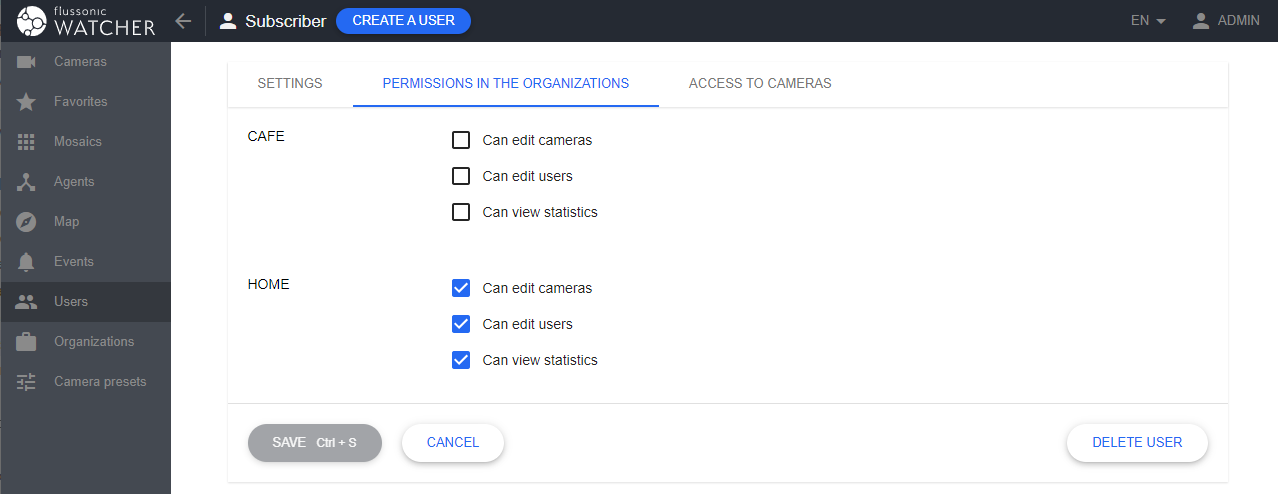
- Can edit cameras: the user can add and edit cameras
- Can edit users: the user can add and edit other users
- Can view statistics: the user can view Watcher resources consumed by the Organization.
Note
The user who is Organization's administrator (owner) has all rights within the Organization. In this case you won't be able to save changes with some of the boxes on this tab unchecked.
Another way to edit the user permissions to manage the Organization is in the user settings opened from Organizations — Users on the Permissions in the Organization tab.

If a user is added to several organizations, you can edit access rights to several organizations by opening the user profile from the Users menu. In this case, the user rights in all owned organizations are available for editing on the Rights in the organizations tab:
Granting a user access to cameras
Users can have various permissions to access video received from cameras.
To grant a user access to cameras:
- Go to Organizations and click the number in the Users column next to the Organization where you want to modify user permissions.
- In the list of users that opens, click the user whose permissions you want to modify.
-
In the user settings, go to the tab Access to cameras.
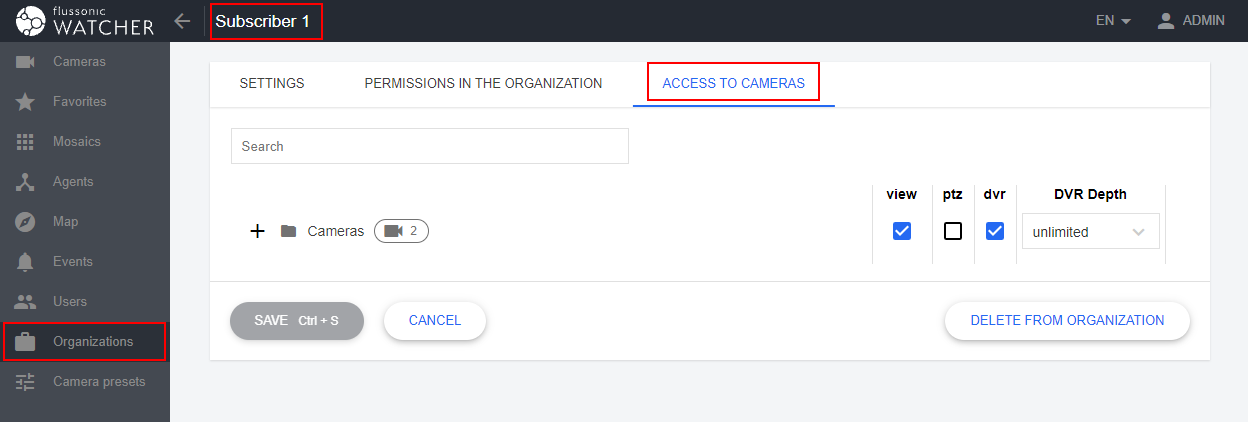 If the Access to cameras tab in inactive, the user is not allowed to manage cameras. To allow managing cameras, grant permissions as described above.
Note
The user who is the owner (administrator) of the Organization has all rights to the cameras in this Organization. In this case the boxes cannot be unchecked and the drop-down list for archive depth adjustment is not displayed.
-
Select folders containing cameras to which you grant this user access to. The selected cameras will be available to the user in the Dashboard.
Access categories are described below.
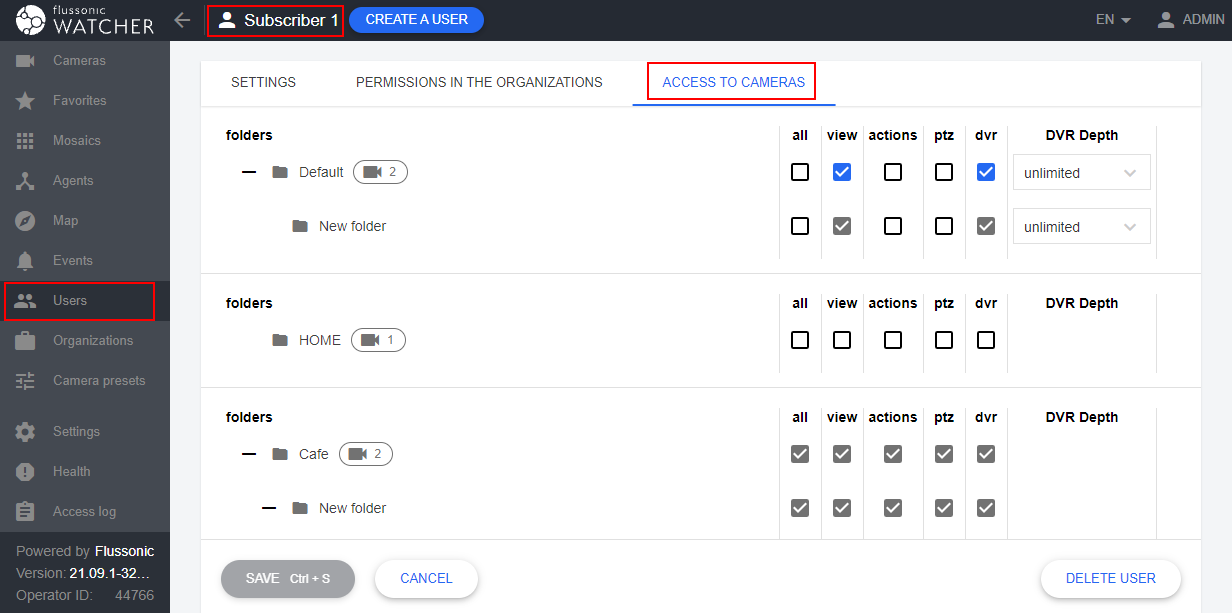
It is also convenient to edit the user's rights to cameras in all organizations to which the user is added by opening the profile from the Users page and selecting the Access to cameras tab:
Categories of access to folders with cameras
- Access to viewing cameras — the user can view live video received from IP cameras of the Organization.
- Access to DVR archive — the user can view recorded video in DVR archives.
- Access to PTZ — the user can control cameras via PTZ.
- Access to actions (displayed in user settings only) — the user can add, edit or execute actions on the Cameras page.
- Custom DVR depth (displayed if the user is not Organization's administrator and has access to DVR) — the user has custom permissions to access the archive of cameras within the folder. For example, if the camera has 1-week-deep archive, you can provide your subscribers with access to just last day recordings and charge for "unlimited" access permissions.
Note
Granting a user access to a folder means that all its subfolders will also be available to this user.
Warning
You can give access only to an entire folder, not to individual cameras in the folder. To give access to only one camera, add this camera to a separate folder and give the user access to that folder.
PTZ works inside a player in Watcher UI only. In the embed player being accessible via the "Shared URL" the control elements for PTZ shall not be shown.