Cameras and cloud synchronization
Open the local Watcher NVR at http://NVR_IP and sign in with an account permitted to manage cameras. Cameras can be added locally. After pairing the recorder, cloud Watcher automatically retrieves their list when synchronization succeeds.
Adding cameras
The following instructions describe the local interface of a recorder connected to cloud Watcher.
ONVIF discovery
On the cameras page, open Add camera → Find cameras on the network. This option is available to the local Watcher NVR administrator. The recorder needs network access to the cameras for discovery; ONVIF must be enabled on the devices.
Wait for the discovered devices list. Check their IP addresses, models and available video profiles.
ONVIF credentials may be required to retrieve profiles and video. Use the username and password of a camera account with the necessary permissions. If a profile preview is available, open it to check the image.
Enter a descriptive name, such as “Entrance” or “Parking”. If the discovery results allow editing the name, use the pencil icon.
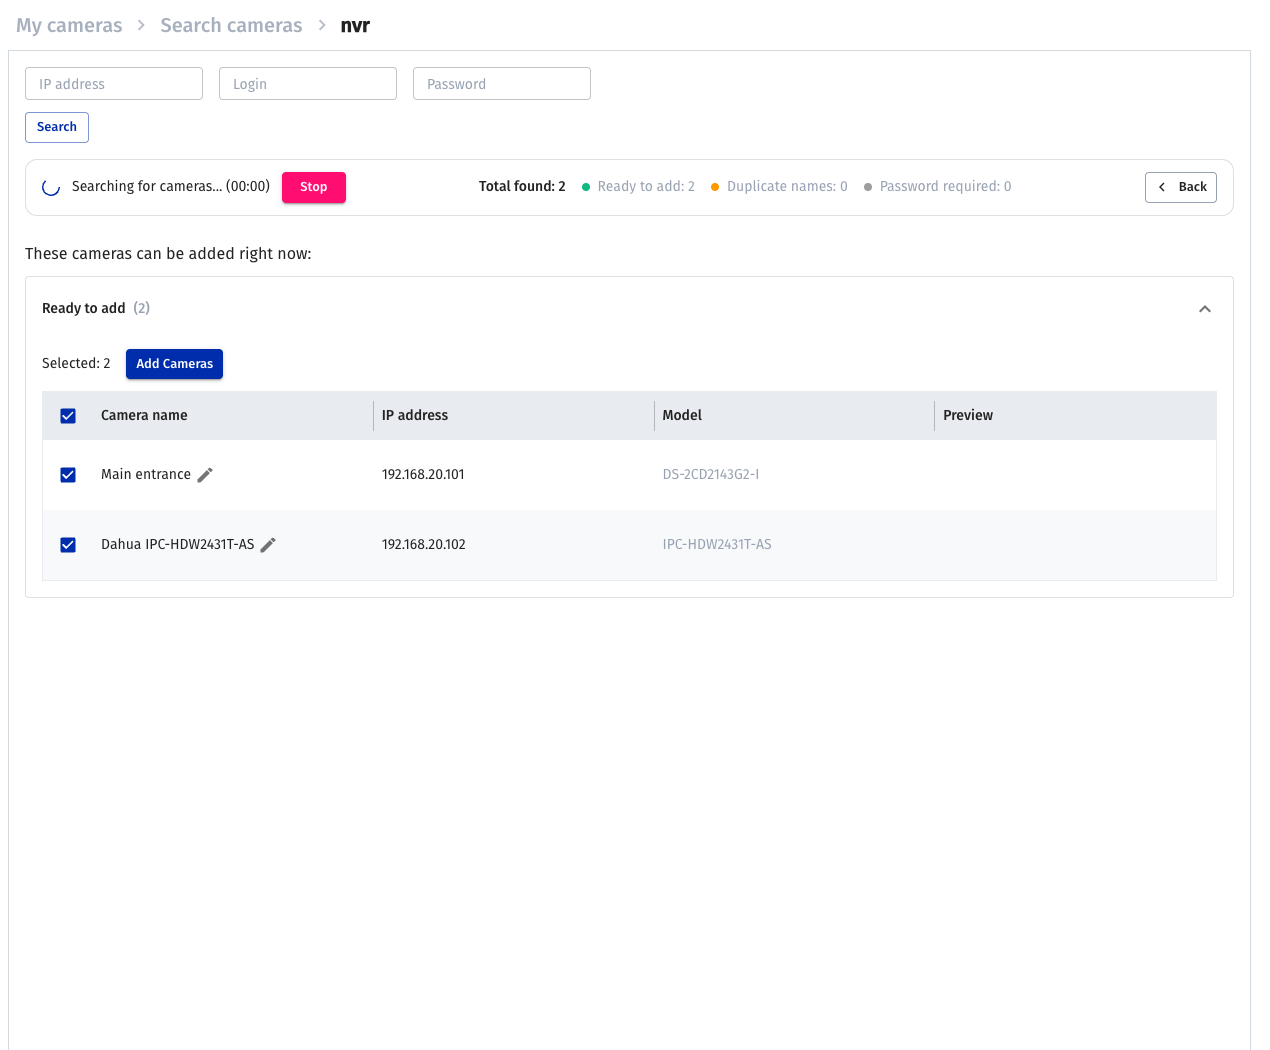
Example discovery results: device addresses and models, camera selection and the name field.
Click Add cameras for the selected cameras. Then open the added cameras' settings, check their main stream and substream addresses, and open live video.
If discovery returns no results, check ONVIF, credentials and the network segment. For a camera with a known address, use adding by IP.
Adding by address
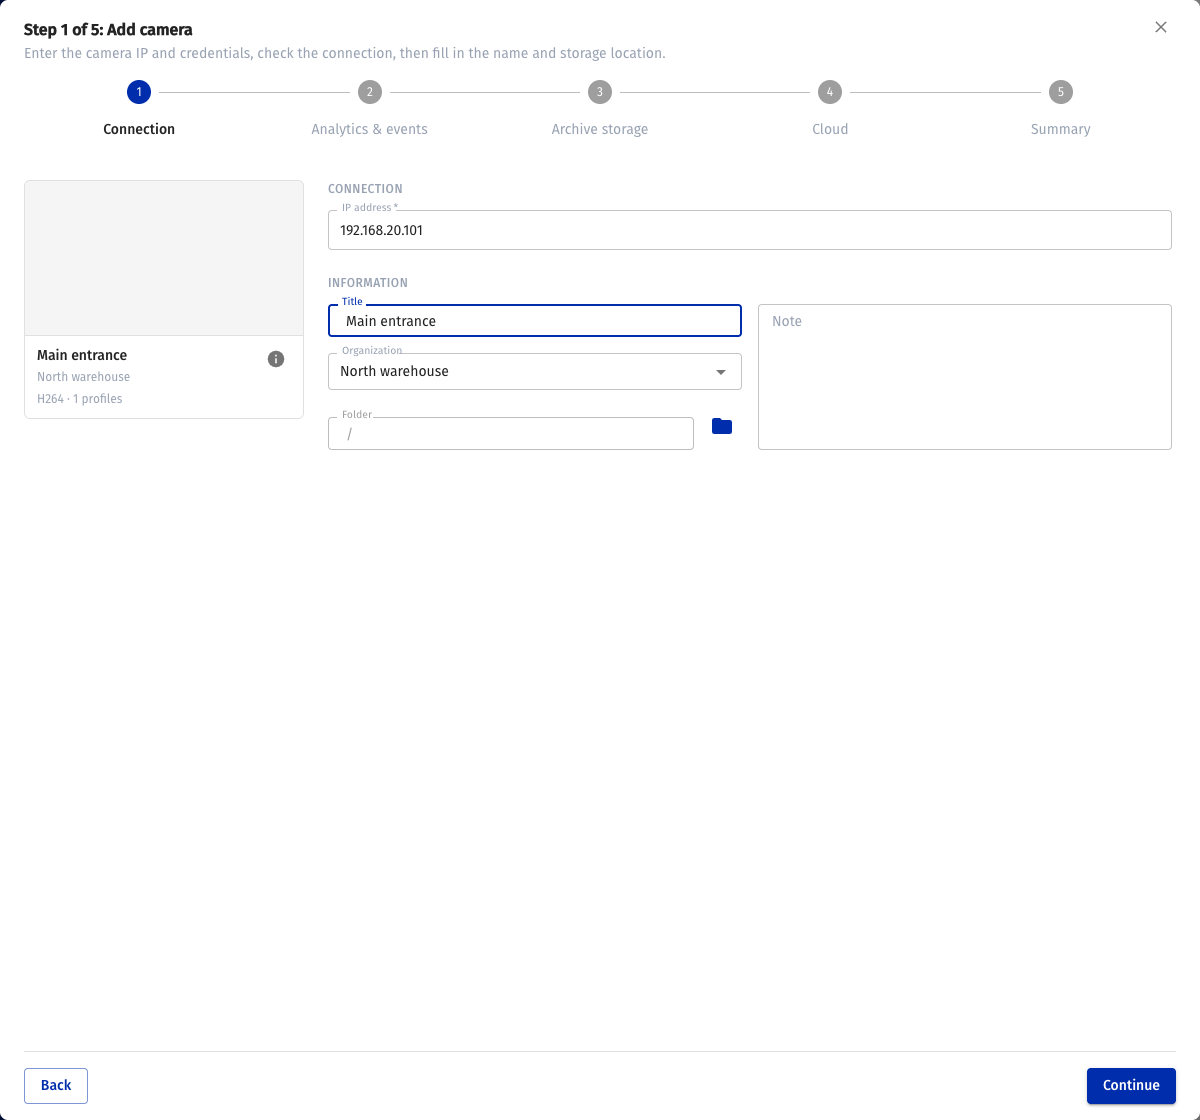
In Add camera, select I know the camera's network address. This opens the ONVIF connection wizard. Enter the network address and, if requested, ONVIF credentials, then wait for the device check and available video profiles. Select the required profile and continue configuring the camera.
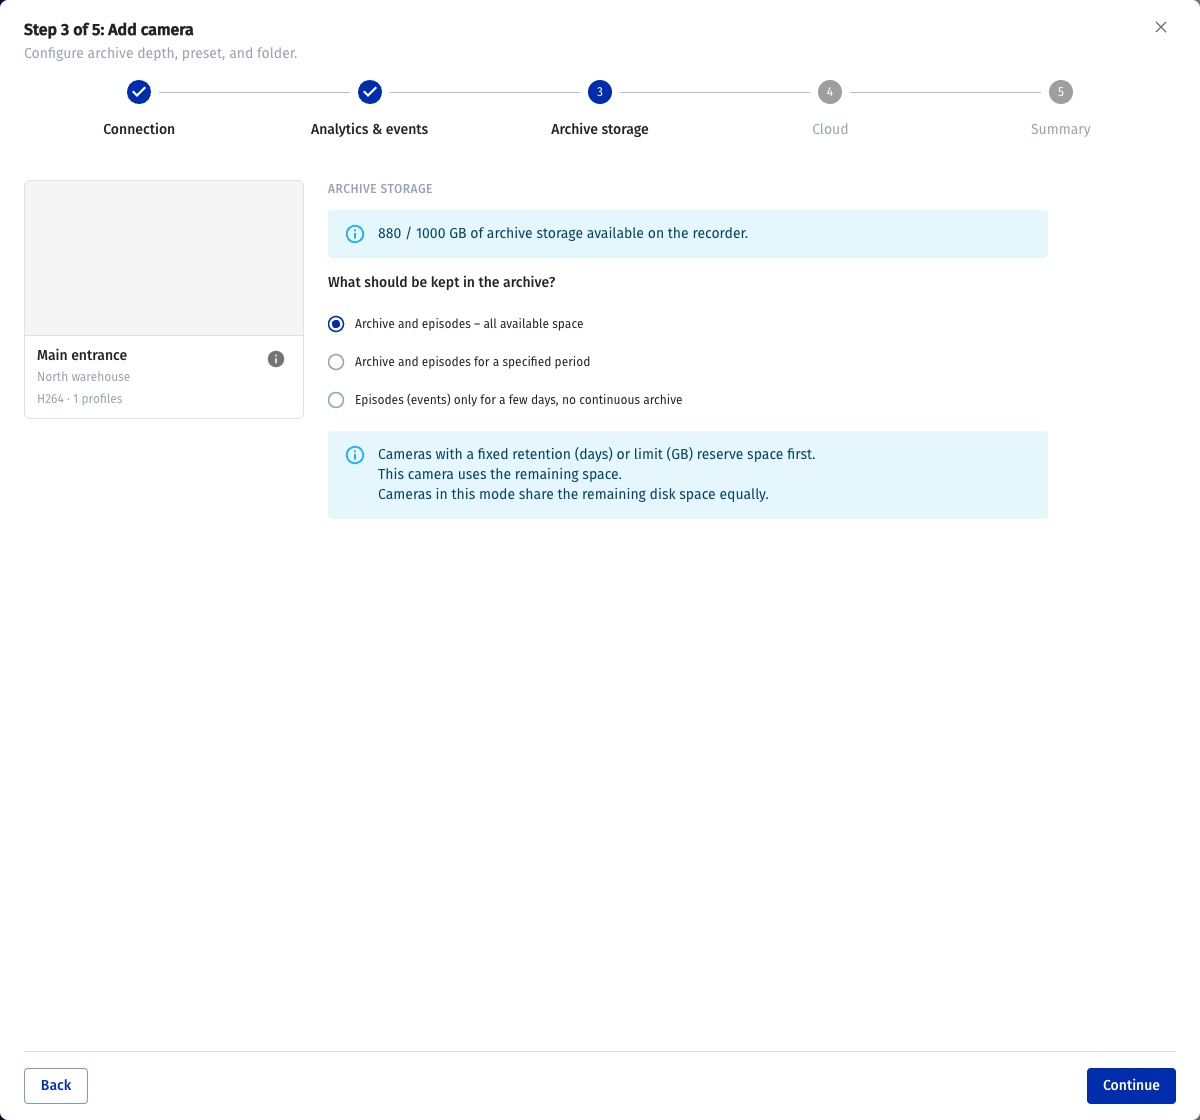
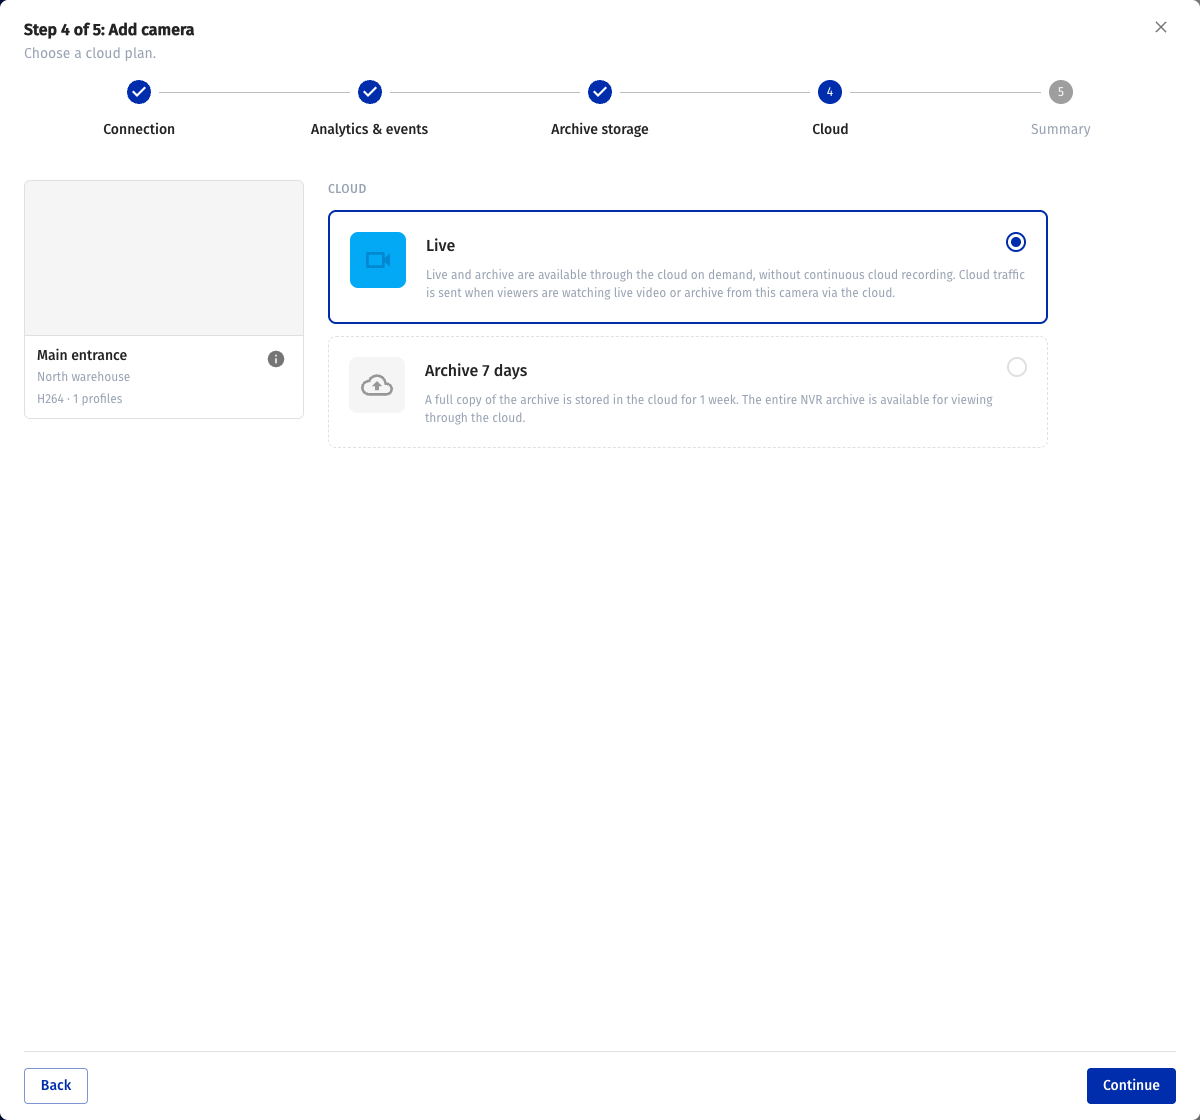
Enter the camera name at the configuration step. At Archive storage, configure local recording; at Cloud, select the cloud profile. Local recording and the cloud archive are configured independently. Check the selected settings and complete the wizard.
When adding a camera, local recording settings are available at the wizard's Archive storage step.
Select the cloud profile at the Cloud step of the add-camera wizard.
Open the added camera and check that live video plays. A missing preview alone does not mean that recording is disabled: check the connection and actual playback.
Storage settings for an added camera
Local archive
Open the camera settings and configure retention and the available local DVR size limits. The disk must be prepared and accessible to the recorder. A preset may restrict editing of individual fields.
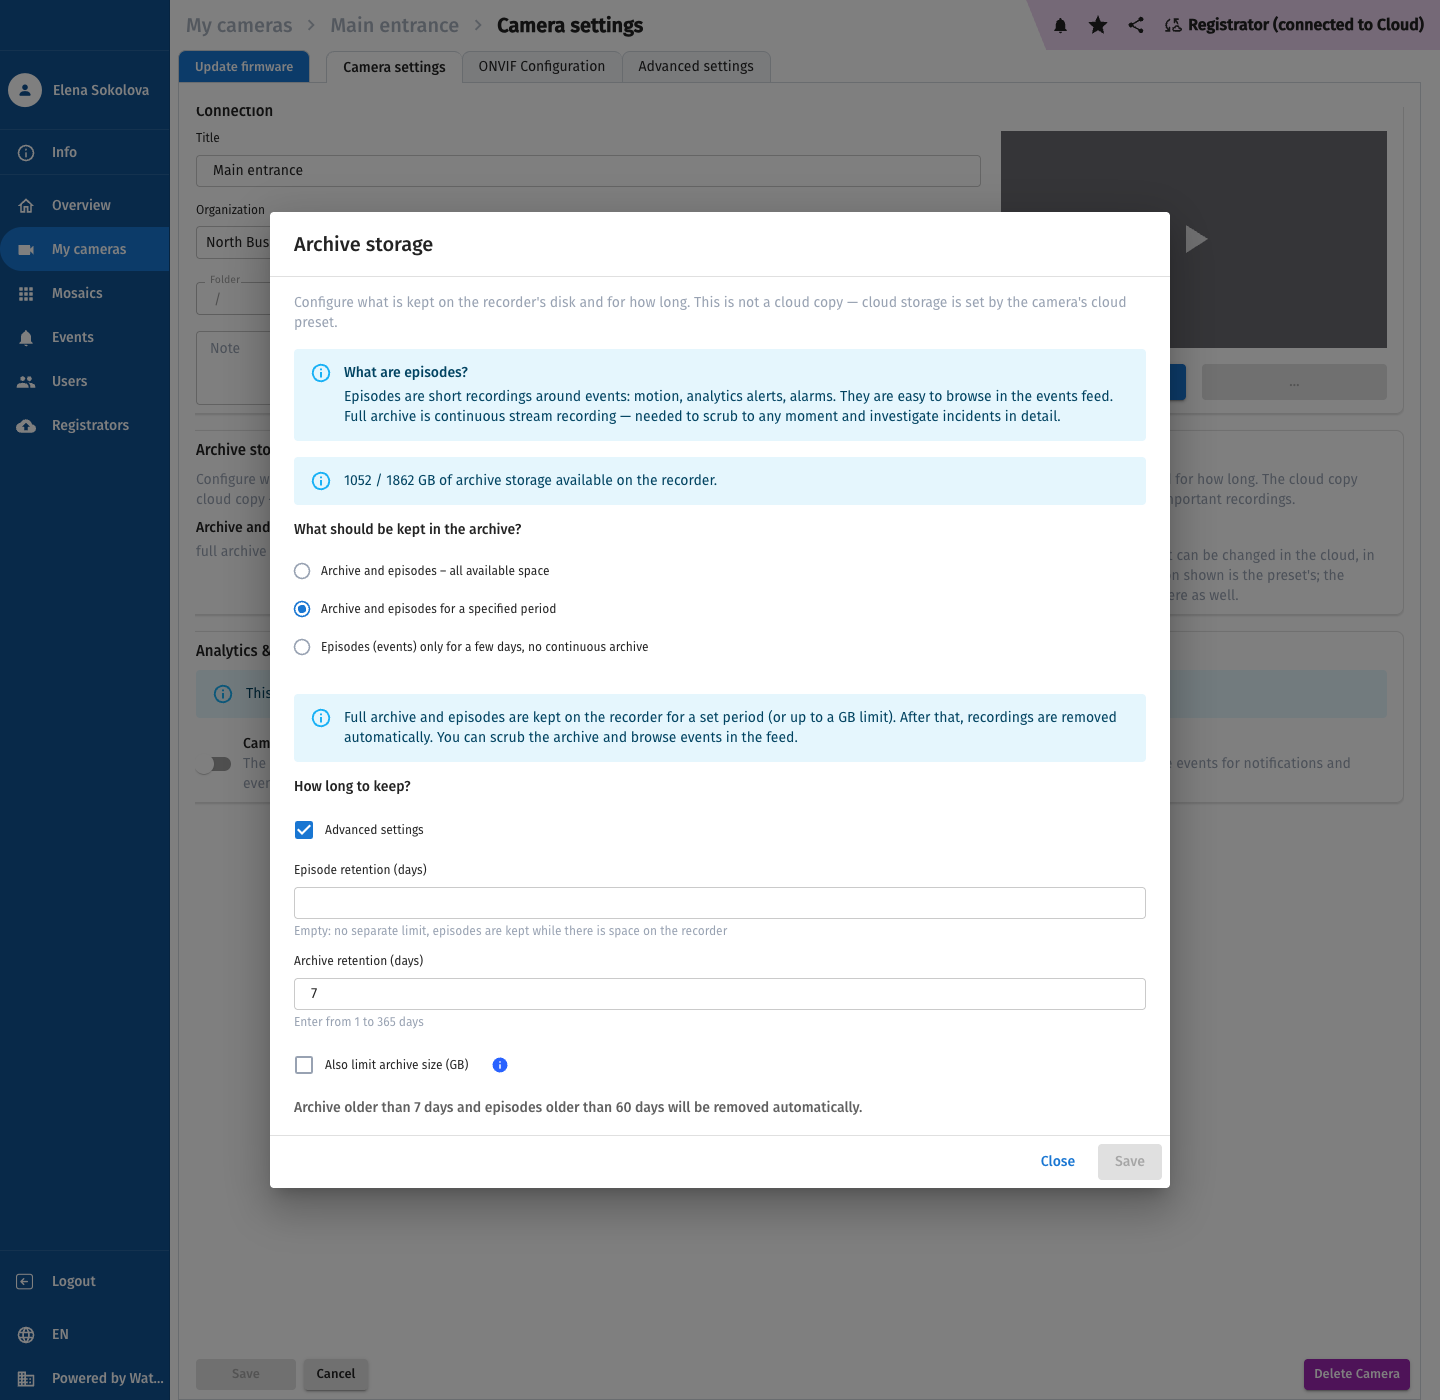
Local archive retention and size; episode retention is configured separately.
After saving, wait for recordings and open an earlier interval in the player. Permission to view live video does not grant permission to view the archive.
You can check disk usage per camera in cloud Watcher: Registrators → required NVR → Storage → Storage information. If the NVR reports per-camera statistics, a table opens with search and sorting by used space. See NVR storage and traffic.
Cloud storage
In cloud Watcher, open the imported camera's settings. Select an available cloud preset or configure the permitted storage parameters. Changing cloud archive depth does not automatically change local NVR retention.
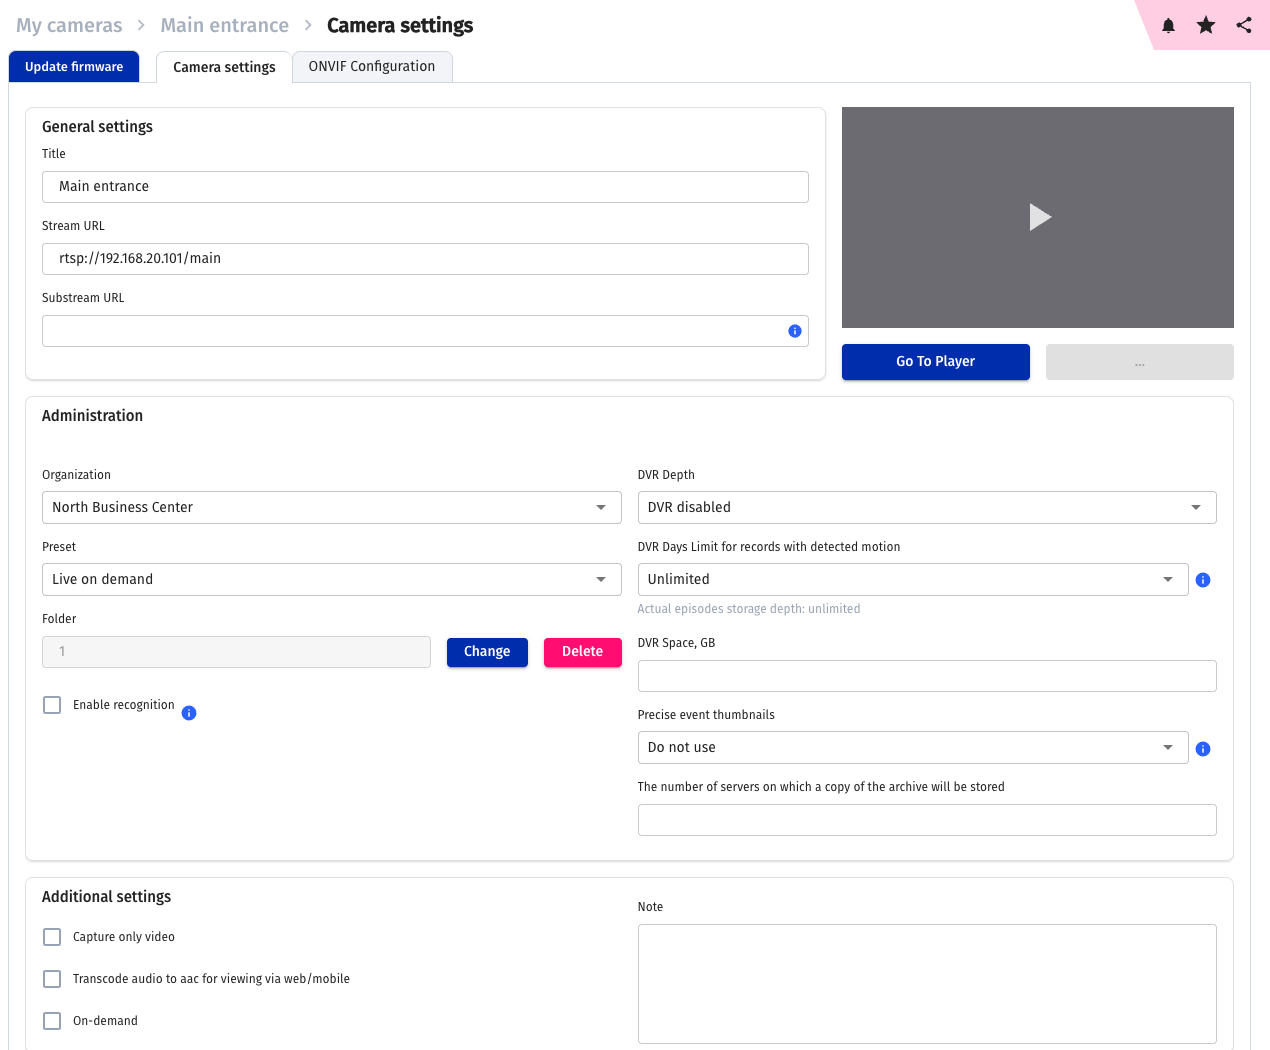
Camera cloud storage: the “Live on demand” preset is selected and cloud DVR is disabled.
Cloud synchronization
Watcher periodically synchronizes the cameras of an accessible, connected NVR. Adding or changing a camera locally does not require a separate manual import for each change. The cloud Organization's limits must permit creation of the cloud camera.
To check the result or request an update on demand:
- In cloud Watcher, open Registrators and select the NVR in the required Organization.
- Click the recorder's name. Opening its card requests synchronization of the camera list.
- Wait for the result and check the imported cameras.
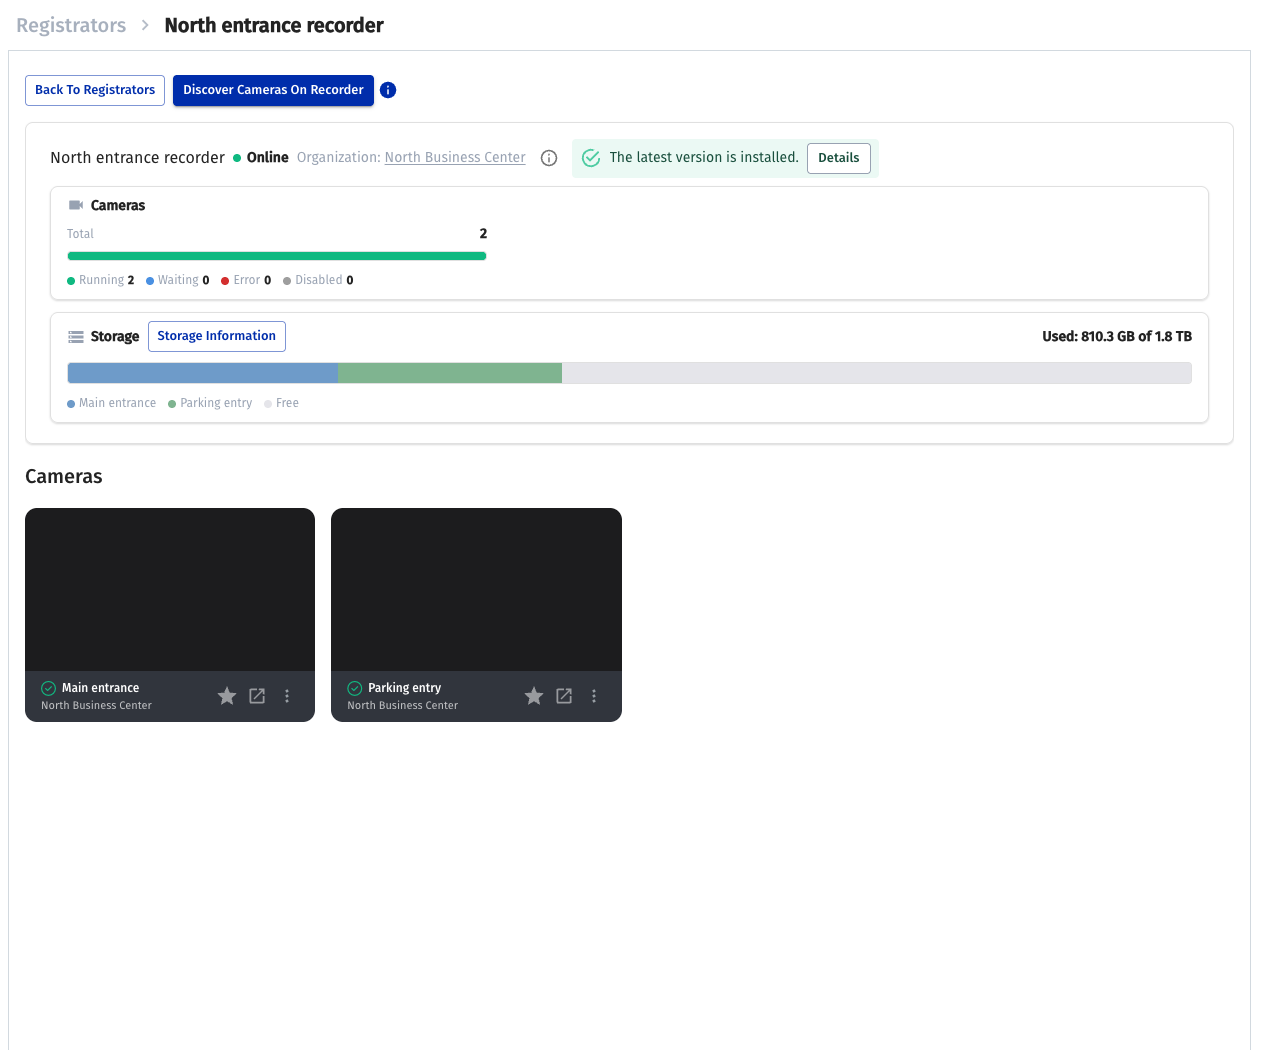
Cameras retrieved from the NVR during synchronization and their states.
Synchronization creates or updates the cloud representation of cameras. Its duration depends on NVR availability, the number of cameras and the connection; there is no guaranteed completion time.
A green connection state confirms recorder availability and does not check recording on every camera. After synchronization, open the required cameras and archive.
Where to change settings
The recorder defines local video source and recording settings; synchronization updates their cloud representation from the NVR response. Changes to these settings made in the cloud are sent to the device and saved after it confirms them. Such changes are rejected when the NVR is unavailable. Cloud storage settings are separate and do not replace local settings.
When changing a local camera already linked to the cloud, read the interface warning and check synchronization after saving. Do not change the same setting simultaneously on both sides.
If a camera is deleted on the recorder
After successfully retrieving the full camera list, the cloud marks a missing local camera as deleted on the NVR. Its cloud representation and cloud archive are not automatically deleted. A cloud representation does not mean that the camera still works on the device or that its local archive is available without an NVR connection.
Check where the required archive is stored and whether retention has expired before separately deleting the cloud camera.
Episode synchronization is enabled separately in the recorder menu:
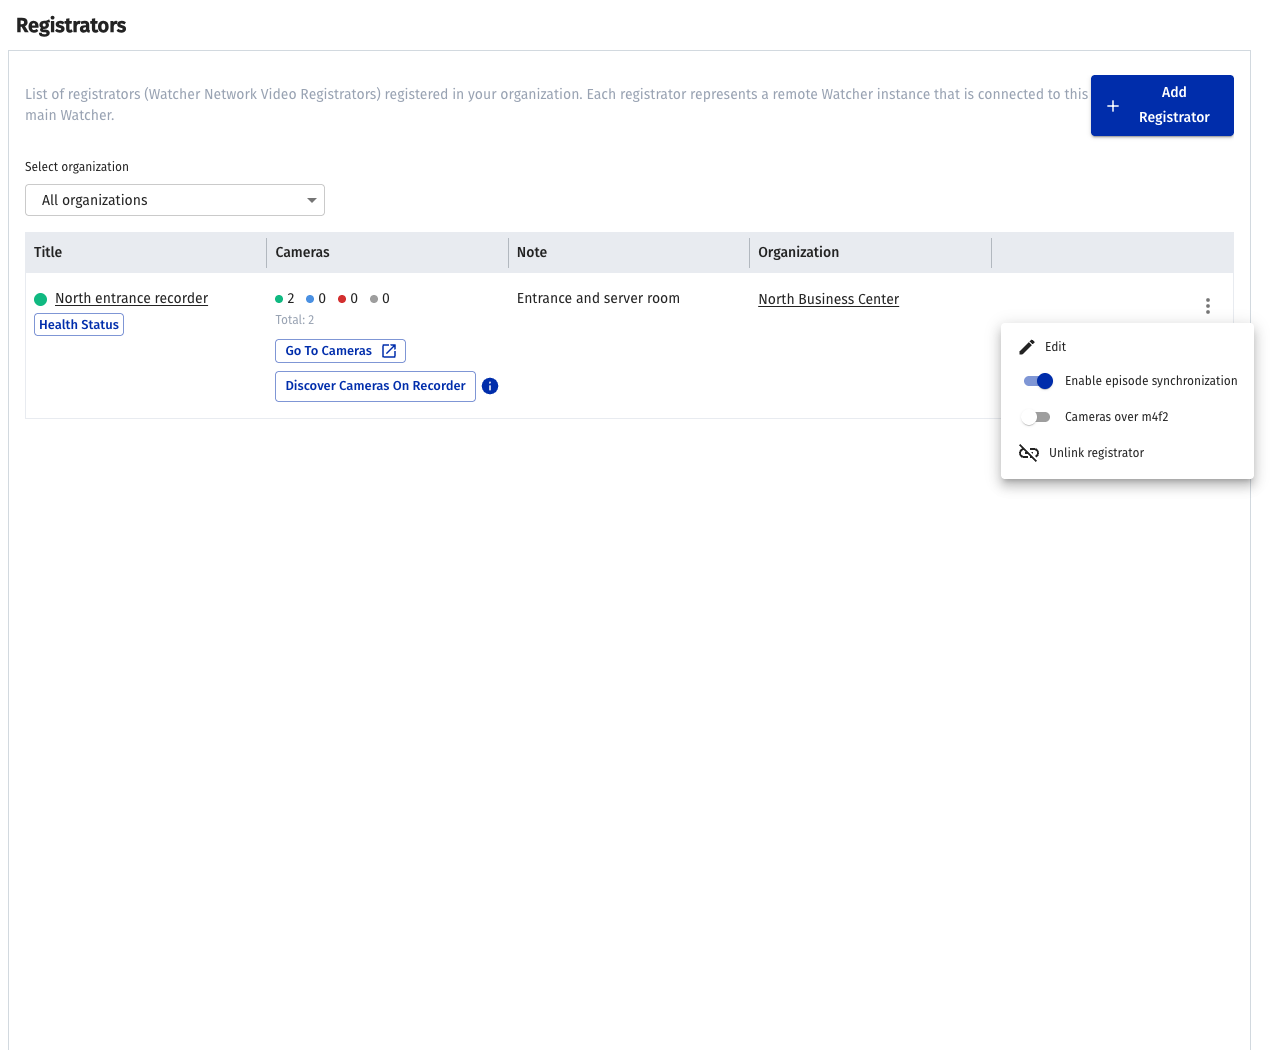
Episode synchronization is enabled independently of cloud DVR.
Episodes, local video recordings and the cloud archive are different data. Before enabling cloud recording, assess the site's upstream bandwidth and check the result on one camera.
A blue indicator may correspond to waiting for a video request. Open the camera and wait for the stream to connect. Check storage settings, actual recordings and user permissions to diagnose a missing archive, rather than relying only on indicator color.