IPTV/OTT quick start guide
This page will teach you how to use Flussonic to implement basic steps of the IPTV/OTT pipeline:
- Capture an MPEG-TS stream
- Make a multibitrate video
- Write the stream to an archive on disk
- Deliver the multibitrate live or archive video via the HLS or any other protocol
In a real system, you will be able to use more features such as cluster ingest, CDN, viewer authorization, etc.
See also:
- Quick Start with Flussonic Media Server about installation and activation of Flussonic Media Server, receiving and playing the first stream.
- IPTV/OTT based on Flussonic about IPTV/OTT objectives and means of solving them using Flussonic.
- Flussonic implementation guideline for IPTV/OTT providers is a complete guide to the IPTV/OTT pipeline based on Flussonic with detailed explanations, calculations, examples, etc.
How do I obtain MPEG-TS
MPEG-TS can be captured via UDP from satellite headend or from a DVB capture card:
- For detailed explanations about multicast ingest and related issues, see Multicast Receiving.
- Learn how to capture video from DVB cards directly to Flussonic.
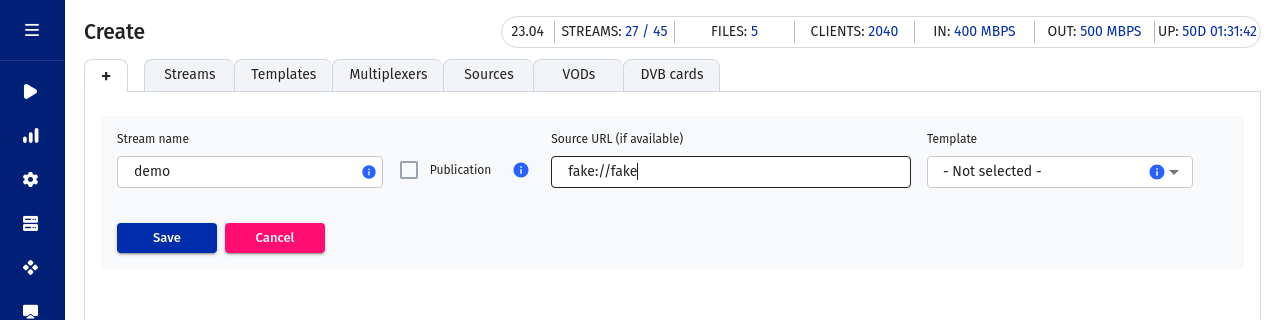
In any case, you should enter an appropiate URL as a stream source when you add a stream to Flussonic. To do so, open the Flussonic UI and click Add next to Streams, and then enter the stream name and its URL.
In the example, we create a stream having a UDP source, name it demo, and add a source URL fake://fake:
How to transcode a stream to a multibitrate video
Multibitrate video contains several tracks of various quality in one stream. This is required so that one could select (automatically or manually) video quality on the client device depending on the quality of the connection. Learn more about transcoding on the Transcoder page.
To make several tracks from the source one, set up the transcoder on the Transcoder tab in the profile of the stream created above. Just click Add Video Track and set the parameters for the new track. For a detailed description of the parameters, see here.

How to check that new tracks are added
You can check the tracks that are available for output on the Overview tab in stream settings. If you have configured the transcoder correctly, you will see two video tracks (v1 and v2) in the Output media info section next to the Player, and the tracks will be available for selection in the Player itself.
How to configure the DVR
With Flussonic Media Server, you can record video streams to the archive on disk and then play the recorded video. We call this functionality DVR (digital video recording).
Flussonic allows maintaining a specific archive depth (duration, for example, in days) and disk usage limit. DVR is ideal for Catchup services and embedded autonomous solutions.
Note
Flussonic stores recorded video streams in its internal representation, independent of any specific video protocol. You can access a recorded stream via various protocols. The only thing you need is to enable DVR by adding a special option to the stream settings, and then use a special URL to play it back.
The archive of the transcoded stream is stored in several bitrates to allow quick switching between them at playback.
To start recording an archive, click a stream in the list in Media, go to the DVR section, and in the Path box specify the path to the directory on the server to store the recordings. For details, see the guide on how to configure DVR (Digital Video Recording).

How to check that the archive is recorded all right
You can check the operation of the archive in the Flussonic UI on the Overview tab in stream settings. This tab opens the DVR player.
Alternatively, you can open the link for HLS playback (see below) in any Middleware. For example, Stalker can generate such links, and many other middlewares can too.
How to play streams via HLS
To choose the output protocol, you should know which codec is supported by the majority of devices that your audience will use to watch the stream. See the list of supported formats for live streams
Playing live
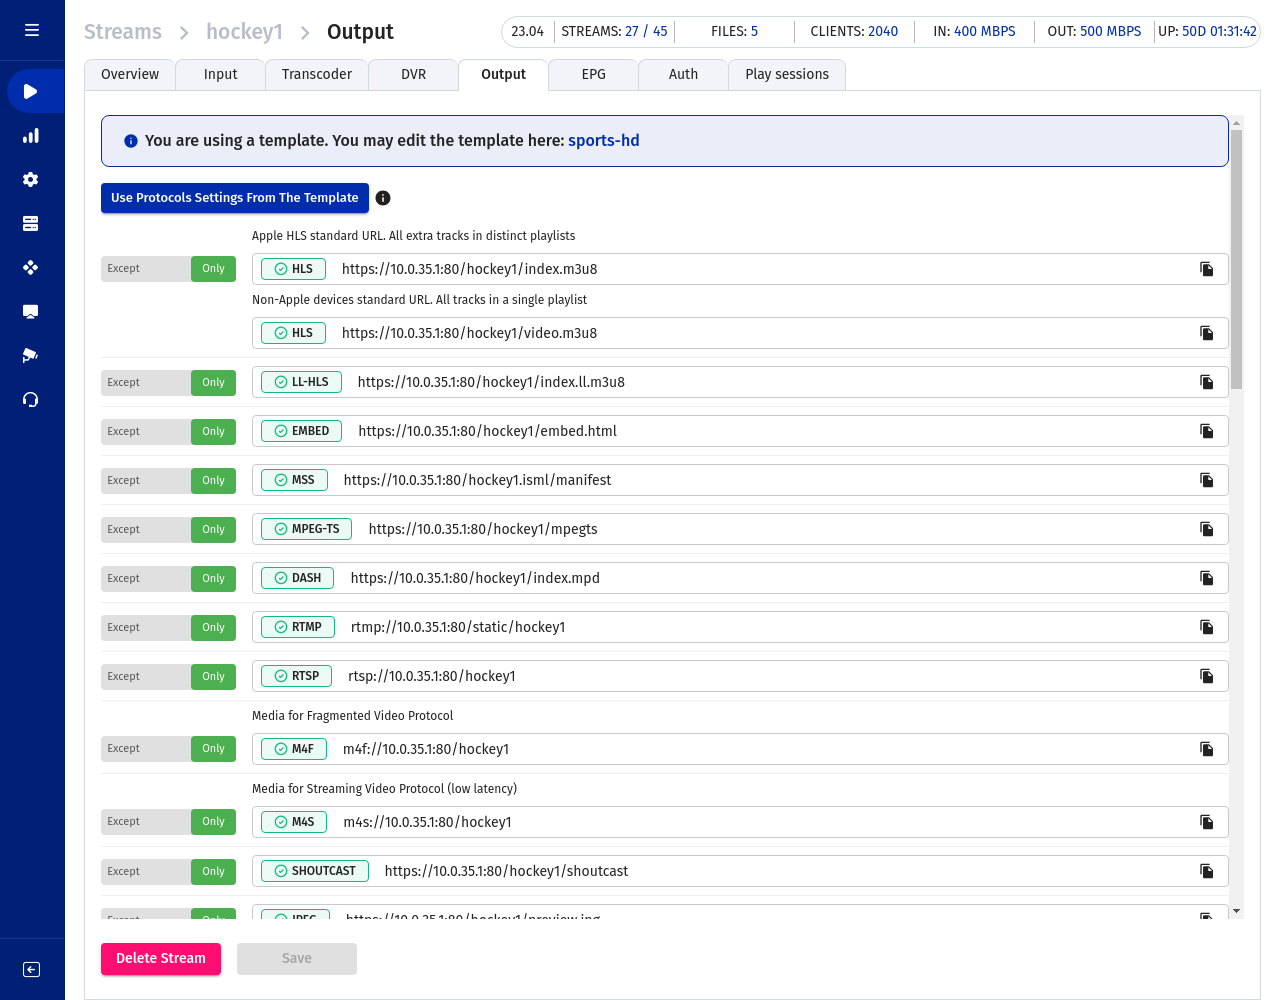
Most links for playing live videos can be copied from the Output tab in the stream profile. See Playback page for the full list of URLs with examples and explanations.
Note that there are two different HLS URLs for multibitrate or multilanguage streams. Learn more below in Multilanguage section.
Playing DVR
The guide on how to access the archive via various protocols gives you the examples of URLs for playing the recorded video stream.
Below you will find the primary DVR playback ways.
HLS URL for DVR
To access the archive via HLS, add the following URL to the player or Middleware that you use:
http://FLUSSONIC-IP/STREAM_NAME/archive-TIME-DURATION.m3u8
Here, TIME is the beginning of the extract, in Unix Timestamp in the UTC time zone, and DURATION is the duration of the extract in seconds.
Example: archive-1350274200-4200.m3u8
Use filter.tracks option to select specific tracks from a multibitrate stream.
Example: filter.tracks=v2a1
Other ways of accessing the archive from Middleware are rewind, Catchup TV, Event playlists.
embed.html Player
Use the Flussonic's player embed.html.
With the ago option, the player will play live and allow rewinding back for the specified number of seconds:
http://FLUSSONIC-HOSTNAME/STREAMNAME/embed.html?ago=7200
Learn more about embed.html?ago=SECONDS
With the dvr=true option, the player will play archive and offer navigation tools:
http://FLUSSONIC-HOSTNAME/STREAMNAME/embed.html?dvr=true
Learn more about embed.html?dvr=true
Save as a .ts file
Request the specified part of the archive and save it as a .ts or .mp4 file. Learn more
Multilanguage
Traditionally, the MPEG-TS protocol provides a standardized mechanism for selecting the language tracks and subtitles in the same video bitrate.
The HLS protocol that is based on MPEG-TS rejects packing multiple audio tracks into the same stream and proposes to place alternative audio tracks in separate segments, which then should be mixed in the player. This is how the iOS player works, but it is not how most players in STB work.
To allow the user see several languages in streaming videos via HLS to STB such as Mag, Dune, or Eltex, use the URLs:
- Live
http://FLUSSONIC-IP/STREAM_NAME/video.m3u8 - Archive
http://FLUSSONIC-IP/STREAM_NAME/video-1429829884-3600.m3u8 - Timeshift
http://FLUSSONIC-IP/STREAM_NAME/timeshift_abs_video-1429829884.m3u8should be used.
When you request such URLs, Flussonic packs tracks in a different way, and makes it possible for players that do not support the HLS standard completely to reach various audio options.
Learn more about all features of playing HLS including methods for playing multibitrate video here.