How to Set up a Full-featured IPTV/OTT Service: Stalker Middleware
This article describes how to install free open source IPTV/OTT Middleware from the company Infomir, what it is for and what options it provides users and admin staff with.
This post will be useful to small operators as well as to end users. Anyone can set up Stalker at home and use it to watch free* IPTV and Internet channels on a set-top box, or to record EPG and TV channels.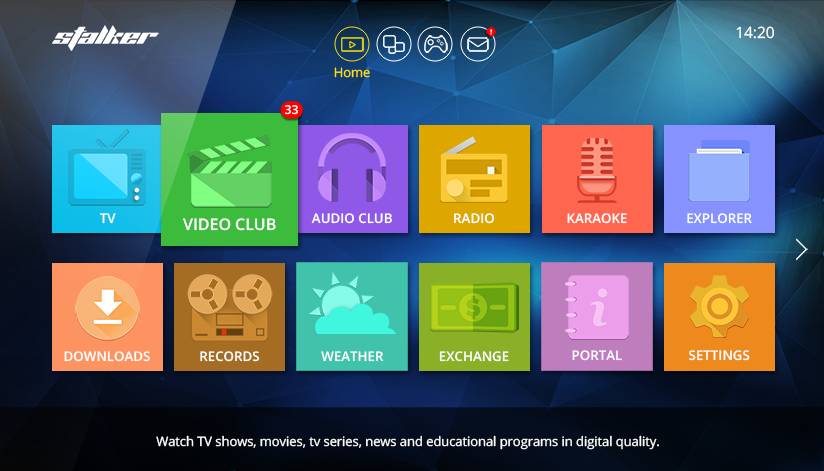
*Stalker Middleware does not contain any links to services or channelsdoes not open access to any content, only provides a convenient interface for the service administrators and end users.
What is Middleware?
There is a good brief definition in Wikipedia:
Middleware is computer software that provides services to software applications beyond those available from the operating system.It can be described as “software glue”.Middleware makes it easier for software developers to implement communication and input/output, so they can focus on the specific purpose of their application.
I agree with this definition and can only add that Middleware is the basic component of an IPTV solution, since it is Middleware that defines the set of services available to subscribers, the user interface, transmission logic and control algorithm. It is impossible to build an IPTV/OTT service without Middleware. There are many developers on the market, so every type of Middleware has its distinctive features: the devices it supports, the CAS-systems it works with, the user interface, the supported video servers, the various billing systems, the API, the cost and the level of technical support.
When an operator selects one of the available solutions, he literally gets attached to the Middleware he chooses, since switching to an alternative is neither easy, nor cheap – it requires changing the software on TV set-top boxes (or their complete replacement, if the list of supported devices differs from the previous one). It also requires re-integration with the billing provider and with the Conditional Access System connection release system. All that takes time and money, and the bigger the subscriber base is, the more complicated it all gets.
Here is our article on Middleware.
Why Stalker?
Stalker is primarily interesting because it is free. I mean absolutely free, with no trials or limited features. Its source code can be downloaded from GitHub.
This is the big advantage that Stalker has over solutions from other providers. I’ve been working in IPTV for many years and I know no other free solutions. I’ve asked my colleagues and even Infomir developers, but they are not aware of any free alternatives either. So, if you happen to know any, please let me know.
Far from every operator is ready to invest in Middleware, since it’s not immediately clear why it’s needed. Surely satellite receivers receive TV channels, CAS-systems protect content, set-top boxes display video, billing systems handle money matters. And what does Middleware do? Does it just display a list of channels and the weather?
Certainly not, but this should be enough to arouse your curiosity about this free solution and install Stalker on a test server to get to know it better.
Installation
Infomir provides a short manual and a VirtualBox image.
To install Stalker, you’ll have to install over 200 packets to your OS. It is recommended to do it on a separate virtual machine or install it in a Docker container, to avoid incompatibility problems.
VirtualBox images
It is pretty easy to start a VirtualBox image, but I’ll describe it in brief:
- Install VirtualBox.
- Download and unzip the image.
- Launch VirtualBox, proceed to the “Machine” menu, click “Add” (Ctrl+A) and select VmVirtualBox_Ubuntu14.04.4.x64_MW.Stalker.Demo file.
- Start the virtual machine, log in (test/test), check the machine IP address and open the admin interface in the browser.
- In the “Storage” admin interface, change the storage IP address to the IP address of the virtual machine interface.
Docker container
Let’s install Stalker into a Docker container. It’s quick and convenient. If you are not aware of what Docker is and if you have never used it, I’d recommend reading the official documentation. It gives a comprehensive idea of how the containers work, although this knowledge is not strictly necessary now.
Developers strongly recommend using Ubuntu Server LTS, though 16.04 is not yet supported and 12.04 is already almost obsolete. Docker lets you start Stalker on your favorite distribution.
Stay Tuned for All the Latest IPTV/OTT and Middleware Trends!
Get updates and articles delivered to your inbox.
To go on, we need Docker and Docker-compose.Here is an example of installation for most distributions:
curl -sSL http://get.docker.com/ | sh
curl -L http://github.com/docker/compose/releases/download/1.8.0/docker-compose-`uname -s`-`uname -m` > /usr/local/bin/docker-compose && chmod +x /usr/local/bin/docker-compose
Create a working folder for Stalker and download the docker-compose file:
mkdir /opt/stalker && wget -O /opt/stalker/docker-compose.yml https://gist.githubusercontent.com/klyushkov/3cc71f3fe3ea27a44c4a6985a1504d4a/raw/c38c746369e4b5238db23ef83ccf5592dc53a63a/stalker-docker-compose.yml
Start Stalker:
cd /opt/stalker && docker-compose up -d
Launch the utility, which will download the latest version of Stalker and initialize the database:
docker exec -it stalker_portal_1 /opt/deploy.sh
Wait for the script to be completely executed, which takes about 4 minutes. When it’s done, the Stalker admin panel is available at:http://ip/stalker_portal/.
Authorize with the standard login/password: admin/1.
Installation without virtualization and containers
Stalker can be installed in the usual way, by just installing the necessary packets and editing a few files manually. This is the most time-consuming and the hardest way, but it works a treat if you are going to launch a production server.
If you already have a server with nginx+apache2+php5, then lucky you are, since Stalker may be started without installing additional packets. But, as far as I know, nginx+apache2 are not commonly used together, since using nginx+php-fpm is far more convenient.
Configuration
After the installation, you’ll definitely want to open a portal on the TV set-top box to make sure that everything has worked and to check out the user interface. But wait – at this stage it will look rather plain, so let’s add some content.
By default, the admin interface is in English. You can switch language at the bottom of the page:
How to add a channel
Open the “IPTV Channels” menu and continue to the “Channels” page.
There will be a pre-set “Test channel” in the list – delete it and add your own channel instead (click “Add a channel”).
Fill out the main fields: “Channel name”, “Channel number”, add a logo and tick the “Basic channel” checkbox.
Click “Add link” and a pop-up window will appear to enable you to add the channel URL and other options displayed. According to the information under the entry field, you should enter “solution+URL” here. The solution here is which library to use for the video playback on the set-top box player. In most cases “auto” will be enough (for example, “auto udp://239.255.1.1:5500”). As for HLS, Infomir recommends the ffmpeg solution.
Since my video server is Flussonic, I’ve enabled temporary URLs support right away. This is required to protect the content from unauthorized viewing.
Here is what result should look like: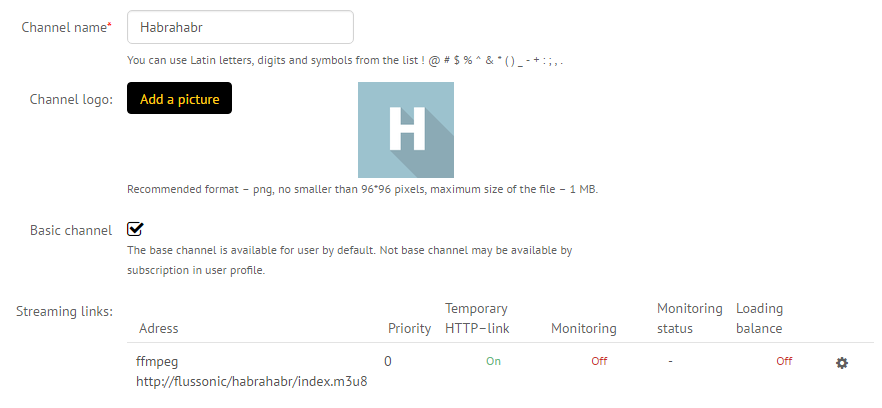
Skip the TV listing (EPG) and the TV-archive (DVR) setup for a while, and save the settings.
How to add a movie
Open “Video club” => “Movies list”.
Adding movies could be very tedious, so thankfully you can use autofill. Simply enter the name of a movie/series in its language of origin, and Stalker will be able to get the metadata from the TMDB database.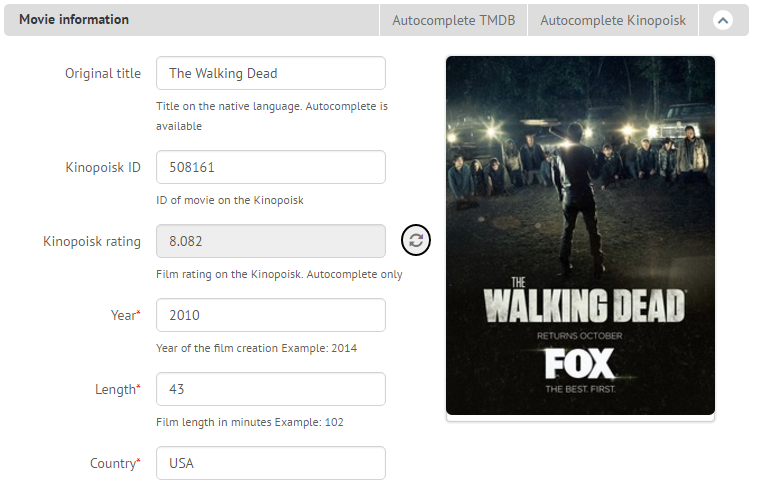
Imagine how time-consuming it would be to manually enter the cast, logo, director, year of production, category and other info to complete the set-top box catalogue for each movie, especially if you had many to add. Thank you, Infomir!
It is also possible to add series with the episodes automatically sorted. You won’t need to enter each episode as a separate movie or enter the number of the season and episode in the name.
You can add several URLs for each movie or episode to watch them in different resolutions. This can be convenient if you already have their sources in different resolutions and do not use multi-bitrate HLS.
TV listing (EPG)
You cannot set up the service without a program guide, since people don’t feel like just switching between channels nowadays. EPG is required not only for the user to be able to see the current TV show name and the coming shows for tonight, but for video-archive organizing that lets users watch TV shows they’ve missed (so called TVCatchup).
Stalker can import EPG from an XMLTV format.
XMLTV is a popular XML-based format of TV program guide description, supported by all EPG providers. It contains the detailed description: show name, start time, end time, category, description, thumbnail, cast, age rating and other info.
To carry on with the configuration, we need to get an EPG provider. There are free and commercial ones. They differ by the number of TV channels, the amount of information (for example not every provider has cast or thumbnails for each TV show). I’m not going to promote any services here, so just google for a TV listing in XMLTV, and let’s go on.
Open “IPTV channels” => “EPG”. Click “Add EPG” button.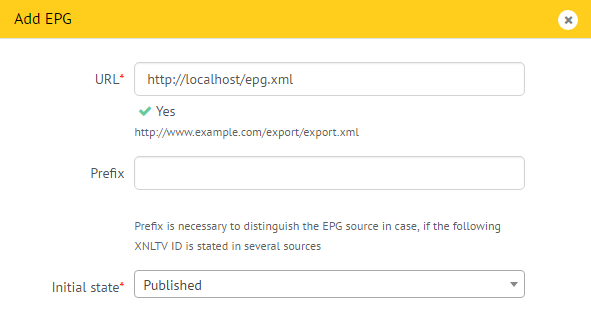
We should add the link to the web-server that hosts the xml file. As my own experience shows, providers mostly upload it to a password-protected ftp-server, and besides they zip it, that is why in Stalker you should add the link to localhost, and in crontab you should add a script that will download and unzip XMLTV to the proper folder.
After the link is added, click “Update EPG”. If everything has been done correctly, the result should be as follows:
Now let’s proceed to the TV channel settings. Open the “IPTV channels” menu => “Channels”, and select your channel editing. What you need is “EPG”: set the TV channel ID there and change the time according to your time zone, if needed.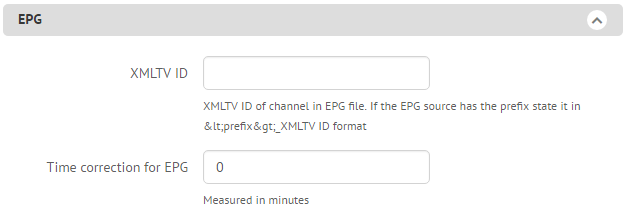
You’ll have to enter ID for each TV channel manually. Unfortunately, I have not yet found a way to do it automatically.
How to find out your channel XMLTV ID
Just open the XMLTV file with any text editor and find the ID there.
Look and feel
Infomir has been developing a new modern interface for a pretty long time. However meanwhile, it is off by default.
I’ve found no serious issues with it, it works just fine, and the screen shot that you can see at the beginning of this article is taken from it.
To activate it, proceed to the “Settings” menu => “AppearanceInterface”. Here, we can see all the available themes.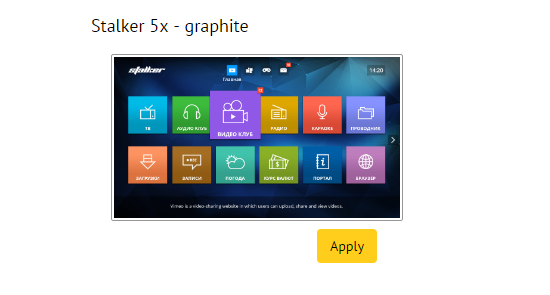
Click “Apply” under the “Stalker 5x — graphite” theme.
How to start the portal on a set-top box
I’m sure you have a MAG set-top box at hand, don’t you?
Use the remote control or USB-keyboard to open the set-top box settings => “Servers” => “Portals” and enter the URL of the server you’ve installed Stalker on.
URL for the clients: http://ip/stalker_portal/c/.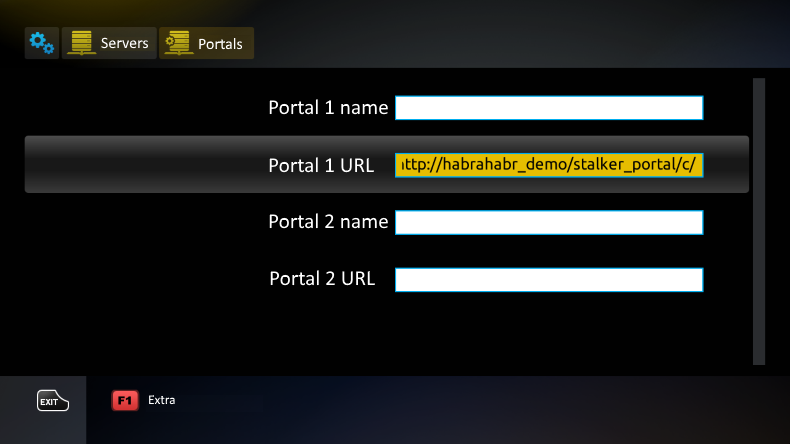
What’s next?
In the next post, we’ll describe how to use the security settings on a set-top box to protect content from unauthorized viewing. There are very many free-riders and competitors/pirates eager to steal your content. It is an extremely serious issue and we often need to help people protect their content from casual viewing and posting onto third-party sites.
READ MORE:
- How to make IPTV service from scratch
- How to Store Video from CCTV Cameras
- The power of DVR
- H.264 and H.265: What’s the difference?