Configuring ad insertion
With Flussonic, you can configure Server-Side Ad Insertion (SSAI) using authorization backend. There are two SSAI modes: by a schedule and by SCTE markers. To learn more about those modes, see Modes of Server-Side Ad Insertion.
Note
Streams with ads inserted via SSAI can be played over HLS and DASH protocols only.
Step 1. Create a VOD location
Store the ad clips in the VOD location on the Flussonic server. Don't specify a path to the local file system or an HTTP source.
To create a VOD location:
- Go to Media - VODs and click +.
- Set the name
ad_vod. - Set the path to a directory on local disk or cloud where the ad files will be stored. In the example we set
/opt/flussonic/priv: this directory already hasbunny.mp4file that we will use further in this guide. When you will add the real ad clips, add them to your own VOD location.

Step 2. Prepare the ad clips
Before inserting the ads into the stream, you should preprocess them. It can be done in any video editor or with Flussonic file_processor API.
In a video editor
Prepare ad clips in a third party video editor according to the following requirements:
- Main stream and advertisement stream parameters (
media_info) must match. Otherwise, Flussonic ignores the ad stream and doesn't insert it into the main stream. - An advertising video must have a GOP size equal to one second.
- HLS players usually skip the first 1-5 seconds of the preroll. It is the feature of HLS players. To fix the issue, add some black frames to the beginning of the video.
With Flussonic file_processor API
First of all, you need to get media_info of the stream you are going to inject the ads to. Use GET /{name}/info.json:
curl http://user:password@localhost/streamer/api/v3/streams/demo | jq .stats.media_info >> fp.json
Note
Replace user and password in curl commands with the username and password you use to log into the UI.
The result will be saved in fp.json file. Open it with any text editor and add the following lines:
{
  "input_files": ["/opt/flussonic/priv/bunny.mp4"],
  "output_file": "bunny_fp",
  "filters": [{
    "group": "transcoder",
    "transcoder":

---
your media_info
---

  }]
}
Create the file_processor:
curl -X PUT http://user:password@localhost/streamer/api/v3/file_processor -d '{"path":"ad_vod"}' -H "Content-Type: a
pplication/json"
Now you can use fp.json for passing it to POST /file_processor/jobs:
curl -X POST http://user:password@localhost/streamer/api/v3/file_processor/jobs --data @fp.json --header "Content-Type: application/json"
In the last command output, find the value of the output_file parameter. It looks like bunny_fp.processed.1711966939428660.mp4. This is the name of the prepared ad clip that you need to indicate in the authorization backend. The file is already put in the VOD location that you specified for file_processor.
Warning
Preparation may take some time. First, a file with a .tmp extension will be created on disk. Do not remove or move it. Wait until file_processor finishes and the resulting file appears.
Step 3. Authorization backend for SSAI
To use SSAI, implement an auth backend. Your auth backend should response with the JSON structure described in the API schema.
How to make an auth backend:
-
Below you will find two examples of JSON for two modes of SSAI. Since the
demostream that we create on next step does not have SCTE markers, use the script for SSAI via regular intervals.Save JSON to the file in
/opt/flussonic/wwwroot/directory, for example name itad_backend.json.Note
These JSONs do not perform actual authorization, because they do not check any tokens. They can only be tried on for testing ad insertion. To actually authorize playback sessions, follow the instructions on the Authorization page.
-
On the Media - Streams tab in Flussonic Admin UI, create the
demostream withfake://fakeinput.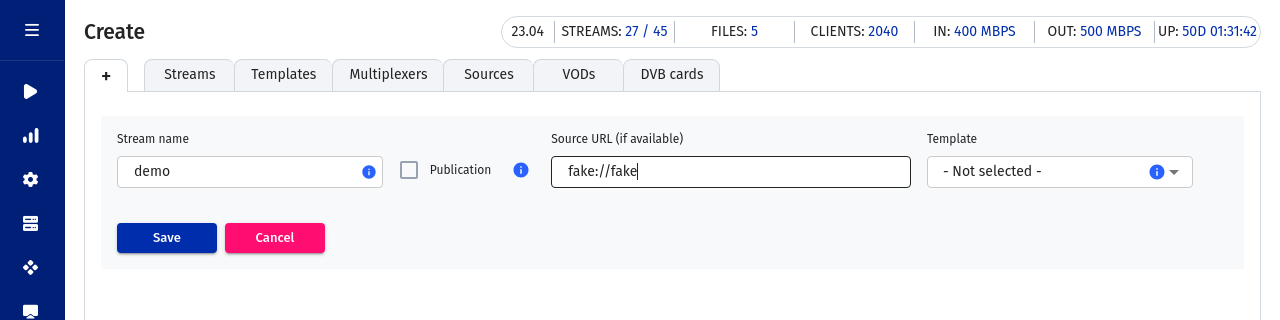
-
Go to Auth in the stream profile, set Authentication type -> custom and specify the following URL for the authorization backend:
http://localhost/ad_backend.json.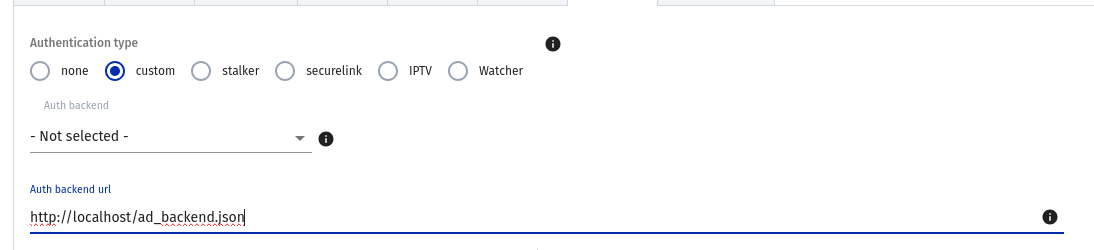
SSAI via regular intervals
{
    "ad_inject": {
        "v": 2,
        "preroll": ["ad_vod/bunny_fp.processed.1711966939428660.mp4"],
        "midroll_interval": 180,
        "midroll": ["ad_vod/bunny_fp.processed.1711966939428660.mp4", "ad_vod/bunny_fp.processed.1711966939428660.mp4"]
    }
}
Flussonic Media Server uses ad_vod/bunny_fp.processed.1711966939428660.mp4 as preroll and then plays all the specified midroll files every three minutes (180 seconds) in the order they appear in the midroll list.
SSAI via SCTE-35 markers
{
    "ad_inject":
    {
        "v": 1,
        "preroll": ["ad_vod/bunny_fp.processed.1711966939428660.mp4"],
        "midroll_insert_by": "splicing",
        "midroll": ["ad_vod/bunny_fp.processed.1711966939428660.mp4", "ad_vod/bunny_fp.processed.1711966939428660.mp4"]
    }
}
Flussonic Media Server uses the file ad_vod/bunny_fp.processed.1711966939428660.mp4 as pre-roll. When the SCTE-35 markers appear, Flussonic plays all the specified midroll files until the end splice point of an ad break. The files are played looped in the order they appear in the midroll list.
Parameters explanation
"v": 1for inserting the ads as separate segments, or"v": 2for inserting ads as segments of the main stream."preroll": ["ad_vod/bunny_fp.processed.1711966939428660.mp4"]is the path to the preroll. Replace the file name with the one returned by preparation script on step 2."midroll_insert_by": "splicing"is the ad insertion method via SCTE markers, or"midroll_insert_by": "interval"is the ad insertion method with regular intervals."midroll_interval": 180is the interval in seconds to play midrolls when"midroll_insert_by": "interval"."midroll": ["ad_vod/bunny_fp.processed.1711966939428660.mp4", "ad_vod/bunny_fp.processed.1711966939428660.mp4"]is the midrolls list. Replace the file names with the ones returned by preparation script on step 2.
Step 4. Test the ad injection
Ensure that it works by playing the stream over HLS or DASH. For example, use the Embed link on the Output tab of the stream.
https://FLUSSONIC-IP/demo/embed.html
If everything is fine, you will see the Big Buck Bunny clip before the demo stream.
Plugins such as AdBlock block the ads. If something goes wrong, try disabling the plugins.
Note
The player on the Overview tab in the stream profile will not play ads. Do not use it for testing this feature.
Tracking events of showing ads to viewers
Collect statistics on showing ads by configuring logging of the ad_inject event with the help of event_sink.