Installing Watcher Cluster and Single
Watcher can run on one server or distribute management and video processing across servers. The following procedure uses Linux APT packages. NVR has a separate installation procedure.
Installation sequence
- Choose the management server's role and install the corresponding Watcher package.
- For a cluster, install
watcher-streameron servers ingesting video and recording archives. - Add the streamers in Watcher and configure addresses and storage.
- Connect a test camera and verify live video and archive recording.
Prepare DNS, time synchronization and network connectivity first. The management server needs access to streamer APIs; clients need access to the interface and video delivery addresses. Do not expose PostgreSQL or Redis to clients.
Install Flussonic Watcher
Choose one option:
| Task | Package | Installed components |
|---|---|---|
| One server for management and video, or management with a local streamer | flussonic-watcher |
Watcher VMS, watcher-streamer, PostgreSQL, Redis and Central |
| Cluster management server without video processing | watcher-standalone |
Watcher VMS, Angie, PostgreSQL, Redis and Central; no separate streamer is included |
| Additional video ingest and delivery server | watcher-streamer |
Watcher media layer, managed through Watcher |
The watcher-streamer package specifies the minimum version of its media layer dependency, flussonic. APT selects an available version according to repository settings; the watcher-streamer package version need not match the running media engine version. Installing these packages does not automatically switch the server to another engine.
Run the following commands as root. Use a prepared Ubuntu 24.04 LTS x86-64 server for this procedure. Check the hardware calculation before installation.
Add the release repository:
apt-get update
apt-get install --yes ca-certificates curl gnupg
install -d -m 0755 /usr/share/keyrings
curl --fail --location --silent --show-error \
  https://apt.flussonic.com/repo/binary/gpg.key \
  -o /usr/share/keyrings/flussonic.gpg
printf '%s\n' 'deb [signed-by=/usr/share/keyrings/flussonic.gpg] https://apt.flussonic.com/repo binary/' \
  > /etc/apt/sources.list.d/flussonic.list
apt-get update
For installation with a local streamer:
apt-get install flussonic-watcher=26.11
For a management server without a local streamer, first add the Angie repository for your OS. For Ubuntu 24.04:
curl --fail --location --silent --show-error \
  https://angie.software/keys/angie-signing.gpg \
  -o /usr/share/keyrings/angie-signing.gpg
printf '%s\n' 'deb [signed-by=/usr/share/keyrings/angie-signing.gpg] https://download.angie.software/angie/ubuntu/24.04 noble main' \
  > /etc/apt/sources.list.d/angie.list
apt-get update
apt-get install watcher-standalone=26.11
Wait for package configuration to finish. Set the administrator username and password in the installer. Then open http://watcher.example.com/watcher/client/, replacing the domain with your server address, and sign in with those credentials.
Check installed versions:
dpkg-query -W -f='${Package}    ${Version}\n' \
  watcher-vms flussonic-central postgresql redis-server
systemctl --failed
A single-server installation creates a local streamer automatically. With watcher-standalone, add a separate streamer before connecting cameras.
Configure the domain
Use a DNS name reachable from user, streamer and Agent networks. Create the DNS record, configure the OS hostname and check resolution from each side:
hostname -f
getent hosts watcher.example.com
timedatectl status
The video delivery address can differ from the management address. If the interface uses HTTPS, the browser also needs HTTPS access to video with a valid certificate. Public address settings are described under streamers.
Watcher Standalone
Angie handles HTTP(S) on the management server. Choose how to configure it before running commands:
- Let’s Encrypt — automatic issuance for an externally reachable DNS name. Follow the next subsection.
- Your own certificate — an organization-issued certificate or a private network. Go to manual configuration; do not run automatic issuance.
Automatic Let’s Encrypt issuance
After configuring DNS and HTTP reachability, request a certificate:
/opt/flussonic/bin/watcher-ssl-enable.sh watcher.example.com
Check the command result and open https://watcher.example.com/watcher/client/. If issuance fails, check DNS and external reachability; the package installation may continue using HTTP.
Your own certificate
For a private network or organization-issued certificate, configure HTTPS in Angie manually. Prepare a certificate with its trust chain and a private key for Watcher's DNS name; clients and Agents must trust the issuing certificate authority.
- Add
SKIP_SSL=TRUEon a separate line in/etc/watcher/watcher.conf. This prevents automatic certificate issuance by subsequent package configuration. It does not disable existing HTTPS. Do not runwatcher-ssl-enable.shover your custom configuration: the command overwrites the HTTPS file. -
Place the certificate and key in your selected server directory. Restrict private key access. Back up
/etc/angie/watcher-standalone-ssl.conf, then write this configuration to it, replacing the domain and paths:server { listen 443 ssl http2 default_server; listen [::]:443 ssl http2 default_server; server_name watcher.example.com; ssl_certificate /etc/angie/certs/watcher-fullchain.pem; ssl_certificate_key /etc/angie/certs/watcher-key.pem; include /opt/flussonic/contrib/nginx-standalone-ssl-params.conf; client_max_body_size 100M; client_header_buffer_size 16k; large_client_header_buffers 4 16k; include /opt/flussonic/contrib/nginx-standalone-locations.conf; }The package supplies the files in
/opt/flussonic/contrib/. Retain bothincludestatements: the first sets TLS parameters for Agent compatibility; the second supplies Watcher and Central routes, including/endpoint. Replacing them with a web-interface-only configuration can break Agent connections. -
Check and apply the configuration:
angie -t && systemctl reload angie -
Set
API_URL=https://watcher.example.comin/etc/watcher/watcher.conf. Set the same address forAPI_URLandUPSTREAM_URLin/etc/central/central.conf. Replace existing values rather than adding duplicate lines. Restart services during a maintenance window:systemctl restart central central-layouter watcher-vms watcher-go -
Check HTTPS from a client network, user login, an existing Agent connection and video from its camera. The sign-in page alone does not verify
/endpointor Agent TLS.
This procedure configures the management server's certificate. When changing an existing installation's DNS name, separately check the address saved in Agents: changing API_URL does not reconfigure their previous connection address. For streamers, check their own certificates, API URL and Public payload URL.
Cluster only: install and configure Watcher Streamer
Before adding a separate streamer, you must configure API_URL on the management server in /etc/watcher/watcher.conf. Set it to the Watcher URL with a domain name or IP address reachable from every streamer, for example:
API_URL=http://watcher.example.com
Use your installation's scheme and port. If API_URL already exists, replace its value. Do not use localhost or 127.0.0.1: when requesting external configuration, the streamer would connect to itself instead of the management server. An internal address works for servers on the same network; connections over the internet require a publicly reachable address.
Apply the change on the management server:
systemctl restart watcher-vms watcher-go
This is a Watcher configuration parameter; the API URL field in an individual streamer's settings specifies the address of that streamer.
-
On each dedicated server, add the same release repository and install:
apt-get update apt-get install watcher-streamer -
Enter the license key in the installer. If a license is already configured, you do not need to enter it again or open the streamer's web interface to enter the key.
-
The next question optionally accepts a Cluster key: use the same value when adding the server in Watcher. Do not publish the key in integration documentation or a client application.
If you do not have the key yet, leave the answer empty. The package creates
/etc/flussonic/flussonic.conf.d/cluster.confcontaining{}. Before adding the streamer in Watcher, open this file on the streamer and setcluster_key, for example:{"cluster_key":"EXAMPLE_CLUSTER_KEY"}Replace
EXAMPLE_CLUSTER_KEYwith your key. If the file already contains settings, add or change onlycluster_key, preserving the other fields. If you enter the key in the installer, the file is configured automatically. Package upgrades preserve existing values. -
If you set the key manually after installation, apply the setting:
systemctl reload flussonic systemctl status flussonic --no-pager -
Check time synchronization and management server access to the streamer API. Prepare archive disks and mount points.
The watcher-streamer package disables the media layer's own administrative interface. Change cameras and streamer settings through Watcher.
Move existing streamers to the watcher-streamer package
Before changing packages, back up configuration and inspect the APT plan:
apt-get update
apt-get --simulate install watcher-streamer
Review which packages APT will install or upgrade, then install during a maintenance window. The watcher-streamer package itself applies settings by reloading the running service. Updating its dependency may restart the media layer, so the installation command alone cannot guarantee uninterrupted streams.
Cluster only: create a multiserver cluster
-
Open Streamers → Create streamer. In manual mode, specify a unique hostname and Cluster key, using the exact
cluster_keyvalue from thecluster.conffile you created on the streamer, then save.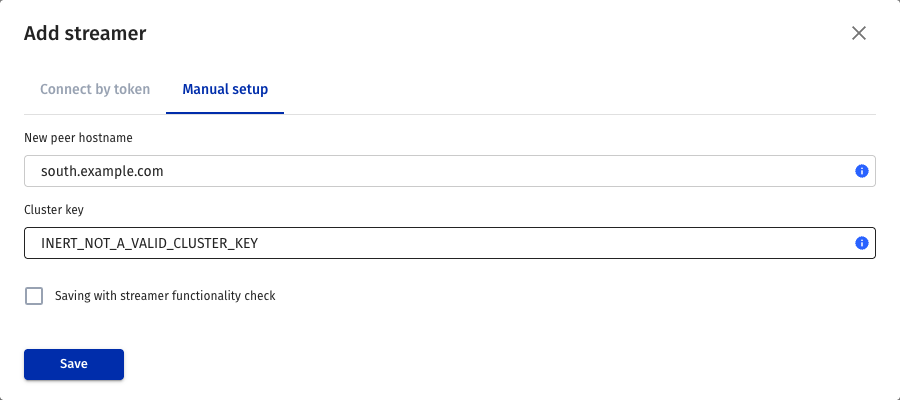
Manual streamer creation: hostname and cluster key.
-
On the streamer page, check API URL, the API address reachable by the management server. Set Public payload URL, the address users will receive video from.



Management and video delivery addresses; domain and aliases are configured separately.
-
Configure storage on the DVR tab, then open the streamer's State and check for errors. If the key check fails, compare the value in Watcher with
cluster_keyin the file on the streamer; after changing the file, runsystemctl reload flussonic. See streamer state for details.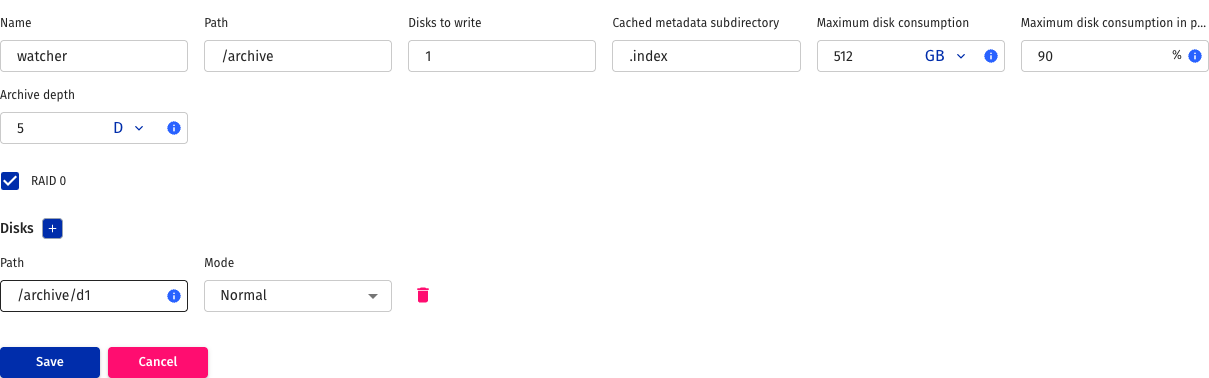
DVR storage configuration. Check camera recording after saving.
-
Connect a test camera. Check the stream in a browser and the recorded interval after recording begins.
Adding a server record alone is insufficient: API connectivity, camera video ingest and client delivery access must work. Use zones to restrict camera placement.