Media server quick start
The primary goal of this quick start tutorial is to introduce you to Flussonic Media Server. By the end of this tutorial you will learn how to:
- Install Flussonic Media Server
- Configure and view a video stream
- Publish video to Flussonic
- Upload and view a video file
Note
In this documentation, we will use placeholder IP addresses (or URLs) of the Flussonic server (such as FLUSSONIC-IP). Please replace placeholder IP addresses with the actual IP addresses used on your server.
Flussonic Media Server
Flussonic Media Server is software for video streaming server capable of a wide variety of tasks including mass storage, transcoding, live and on-demand video delivery and control over video consuming and video streams.
We will demonstrate all main scenarios using Flussonic web interface. However, if you prefer to use API, please refer to Flussonic API reference.
Installing Flussonic Media Server
Installation
This section briefly describes how to install Flussonic Media Server so that you can install it quickly.
To install and configure Flussonic Media Server, you will need a computer with Linux connected to the Internet, and a license or trial key. A trial key can be requested on this page.
The main requirement is that the system must be 64-bit. We strongly recommend using Ubuntu Server. You can find the whole list of system requirements here.
Note
Despite the fact that Flussonic Media Server will work on Ubuntu Desktop, we do not recommend using it, because Ubuntu Desktop has its own features with power management, energy saving, Network-manager and background updates, and other differences that may affect on performance. It is also possible that some third-party software and drivers may not work on it.
If you don't have an available suitable system at hand, you could rent a small cloud instance at Digital Ocean for the time needed to try out our software.
To install Flussonic Media Server you will need access to a Linux console as the 'root' user on your server.
Run the following command in the Linux console (command line):
curl -sSf https://flussonic.com/public/install.sh | sh
Then start Flussonic Media Server:
service flussonic start
Now you can open the Flussonic administrator's web interface in a web browser.
The first run of the Flussonic user interface (UI)
The Flussonic user interface is available at http://FLUSSONIC-IP:80/ (replace FLUSSONIC-IP with the real IP address of your server).
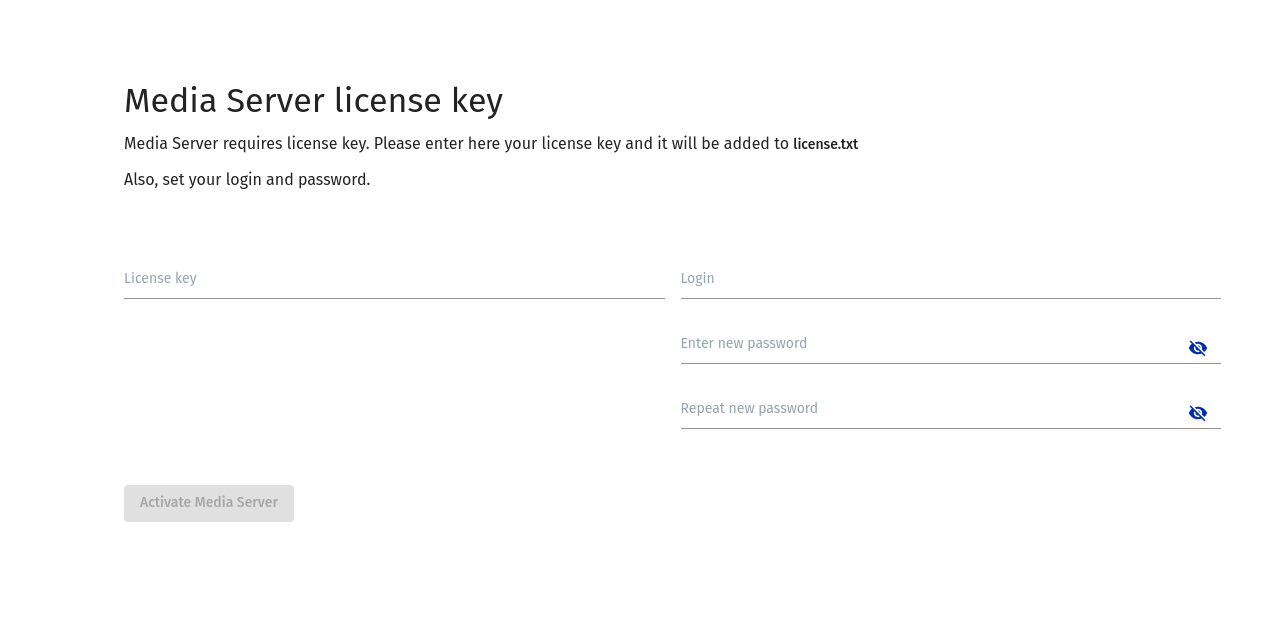
On the start page Flussonic asks you to enter the administrator's username and password and the license key that you have received.
Warning
Permanent Internet access is required for activation with the license key and continuous use of Flussonic Media Server. Learn more at Using the License Key.
Warning
Both login and password must NOT include any of the following characters: @, ;, #, [, \, /, =, $
Checking the installation
You can check whether your Flussonic installation is correct by visiting http://FLUSSONIC-IP:80/, where FLUSSONIC-IP is the address of the server on which you installed the software. The Flussonic administrator's web interface opens if the installation was correct.
If the web interface failed to open, please check the details in the Installation section or contact Flussonic technical support.
See also:
- The detailed instruction on how to install the software can be found in the Installation section.
Live streaming
Flussonic can receive streaming video in two main ways: acting as a client or a server.
When acting as a client, Flussonic connects to a video source to retrieve (ingest) the data. When acting as a server, Flussonic waits for external systems to connect and then it receives video for publication.
Ingesting a stream
A video source can be an IP camera, other video streaming server, a specialized program working with a DVB card, and almost any system that can stream video over the network. Flussonic supports all major video transfer protocols.
In addition, Flussonic can generate a sample video stream fake://fake. This stream can be used, for example, to test the system health.
To add a live stream, go to Media > click Add stream. Specify a stream name (demo) and a source URL (fake://fake). Click Create.
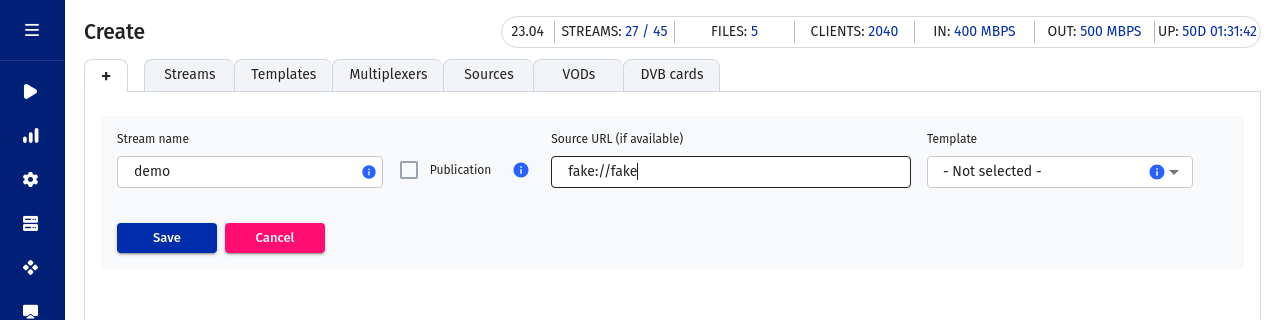
Now open the address http://FLUSSONIC-IP:80/demo/embed.html in the browser and see the result.
See also:
- Learn more about playback URLs here.
- Learn more about live video in the Live streaming section.
Accepting a published video
Publication is a process where an external system connects to Flussonic Media Server and initiates the transmission of streaming video to Flussonic Media Server. To make this possible, you will need to configure a stream or a publishing location on the Flussonic server where you allow publication.
The publishing location can have static or dynamic name:
- Static names are enough when you have one stream from one source that is published fairly permanently. With static name, it is enough to specify a special
publish://option as a source URL when creating a stream in Flussonic. In the publication source, specify one of the links from the Publish links section on the Overview tab in the profile of the created stream. - Dynamic names are useful when you have many changing publication sources and you don't know for sure how many and which streams you need to accept. You will need to configure a template with a publication prefix where you allow publication. A single publishing location will be used to publish one or more streams. The prefix is used to form a stream name. The general structure for a stream name is as follows:
http://FLUSSONIC-IP:80/PREFIX/STREAM_NAME.
Let’s configure a publication with dynamic name:
- To create a template go to Media > Templates > click Add template. Specify a template name (for example,
live-mylive) and a specialpublish://option as a source URL. Click Create. - Then click the name of the created template, and in Template settings specify a prefix (
mylive). Then click Save and apply to streams. -
Go to publication source (external app) to set the stream URL. If you configured the prefix
mylive, then you must specify the stream name that starts withmylive/in the URL, for example,mylive/bunny.Let's transmit video by using the RTMP protocol. We will use the file
/opt/flussonic/priv/bunny.mp4as a source (this file is already included into the distribution package). Run the following command:
/opt/flussonic/bin/ffmpeg -re -i /opt/flussonic/priv/bunny.mp4 -c copy -f flv rtmp://FLUSSONIC-IP:1935/mylive/bunny
Publishing will start. On the Media tab, you can see a stream for publishing that is automatically generated from the template:
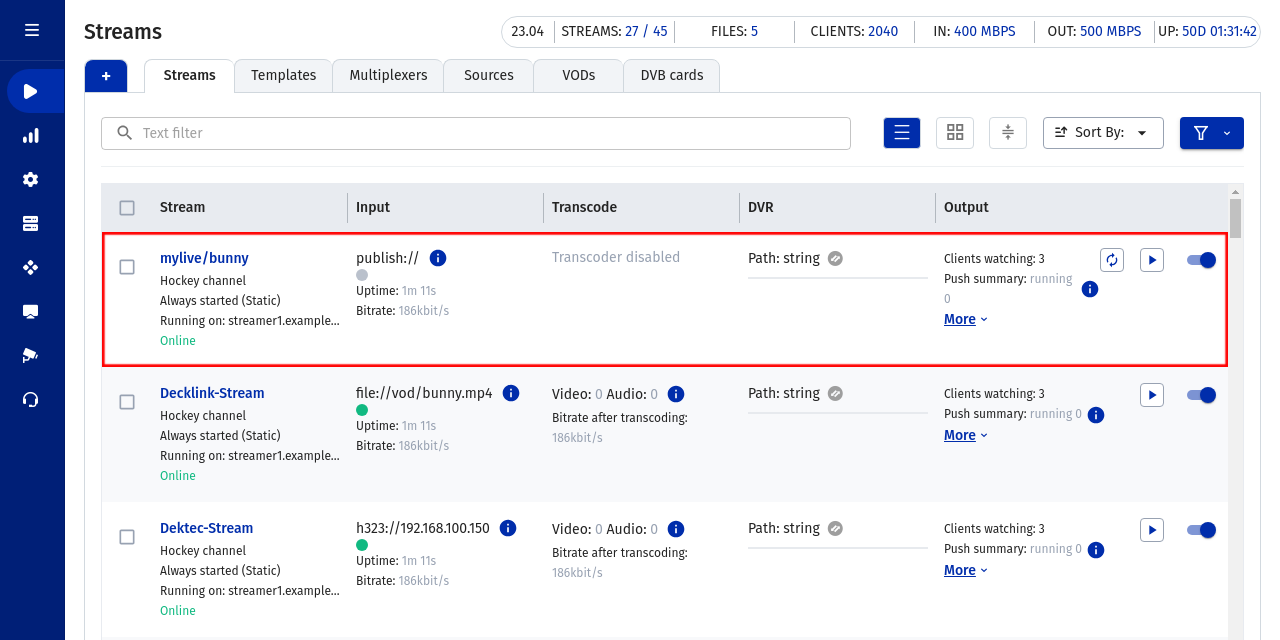
To watch the stream, open this address in the browser:
http://FLUSSONIC-IP:80/mylive/bunny/embed.html
See also:
- Refer to the Publishing section to learn more about publishing video streams to Flussonic.
File playback
In this section you will learn how to play a video file using Flussonic. For playing files, Flussonic uses VOD (Video On Demand) service — an integral part of services based on video delivery. To play a file, you will need to:
-
Set up a VOD location to specify how the path in requests for the file playback should match the real file on the disk or in an HTTP repository. To add a VOD location, go to Media > VODs > click Add VOD > enter VOD name (for example,
Movies) and File directory path (/storage) > click Create.Now Flussonic knows that when clients request
/movies/bunny.mp4, it will need to access the file/storage/bunny.mp4. In other words, everything after the prefixmovieswill be cut and added to the specified path on the disk (that starts with/storagein our example). -
Now you can upload the file to the
/storagedirectory. Go to Media > VODs > click the name of the created VOD location (Movies) > click browse > click Upload Files > select the file to upload (bunny.mp4).Note
The Flussonic distribution package includes a test file
/opt/flussonic/priv/bunny.mp4, so you may just copy it to the/storagedirectory or download the freely available Big Buck Bunny video clip. -
Open this link:
http://FLUSSONIC-IP:80/movies/bunny.mp4/embed.htmlto check how the file is played.
To view all other links for playing the file, go to Media > VODs > click the name of the created VOD location (Movies) > click browse > click the name of the file. You will see the embedded player for playing the file, the HTML code for using in a player on your website or in your application, and the list of the links for playing the file via various protocols.

See also:
- Learn more about video files in the VOD Files page.